

I'll be posting several tutorials on using digital content from various sources with your digital die-cutting machines over the next week or so. Before I get into the tutorial for today, I have a few updates about sales to pass along.

All Cricut cartridges and images are now 30% off on the Cricut website HERE. To get the sale price, you must enter and apply the code SPRING30 at checkout.
I added one of the re-released Creative Memories cartridges (see my post about these cartridges HERE) to my cart and applied the code and this dropped the price of the cartridge to just $20.99 - that's an amazing deal!
This sale will last until April 6th. A few of the re-released cartridges have already sold out so be sure to shop soon if you are looking for one of these cartridges.
I am an affiliate for Cricut.com and I appreciate it when you use my links (by clicking HERE) to go to the Cricut site to shop. There is no additional cost to you when you use these links and it helps to support my blog (and keep me supplied with chocolate!).

I just heard that Lain is going to roll back the price on True Stamp 2014 to the early bird pricing of only $49 in a one day sale. There is a special code that you will need to get this price. I can't post the code until noon (Eastern) on Wednesday, so if you are interested in attending True Stamp 2014 be sure to check back here to get the code at noon.
There will be only 50 seats available at this price and the sale will run until all fifty seats are sold or until noon (Pacific) on Thursday - whichever comes first!


The Lettering Delights Dollar Day sale is scheduled to end today - Wednesday, March 26th. All products are $1 (or $2 for cut-it sets). Click HERE to shop the sale.
If you have a new Cricut Explore you can cut SVG files with this machine through the Design Space. Lettering Delights sells many files that are already in SVG format, along with papers, graphics, alphabets, fonts and more. While many people think of Lettering Delights for "cute" designs, there are quite a few elegant and sophisticated files available as well.

To get started, log in to your account on the Lettering Delights site so you can access the purchased items in your library. Everything you purchase from Lettering Delights is stored in this library so you do not have to download all of the files to your computer.

When you are logged in, click on "My Library" at the bottom of the column on the left side of the page. Then choose "My Cut Its" to see all of the cutting files you have purchased.

Browse through your Cut Its library to find an image or a set that you would like to cut. This set is called "This Mum's For You." Next, click on the "Try Me Now" button at the top right of the image description.

This will bring up a new window where you can view the items in the set you have chosen. You can scroll from side to side and one image at a time will appear in the large window as you scroll.

If you just want to cut one image from a set, click on the "Save" button to download an individual file to your computer. You can see that the file format is listed as SVG directly below the "save" button.

If you want to use all of the items in a set, click on the "Download Entire Set" button.

There are two download links, only one of them will work for Mac computers so be sure to choose the right one.

Click on the appropriate link and then save the file to your computer. Be sure you know where files you download will go to by default so you can find the downloaded file. If you will be downloading many sets, you should set up a file or files on your computer to keep the Cut-It files in a folder hierachy that allows you to find them easily.
If you download the entire set of files they are generally in a zipped file and you will need to extract them from this file.

When you have the single SVG file downloaded, or have downloaded the entire group, unzipped the file and located the individual image within the file that you want to use, you are ready to go to the Design Space to bring the file in to the program for cutting with the Explore.
Open a new file and then click on "Upload Image" at the left side of the page.

On the next screen choose "Vector Upload" to upload an .svg or a .dxf file. Most cutting files are made available in SVG format in digital shops.

After you click the "Vector Upload" button, you will see this screen. Click on the "Browse" button and locate the file on your computer to upload.

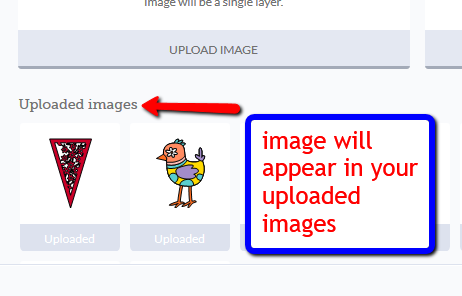
The image will upload and appear on the left side of the screen. You should see the file name assigned to the image by the seller in the title box as soon as you upload the image.

There is a box where you can enter some tags or labels for the file. The more you enter, the more likely you will be able to find the file later if you are searching for it. I added "LD" to indicate the source of the file.


Some SVG files may come in at the size that they are intended to be used but others will be added in the default small size. I believe this depends on how the creator of the file set it up when designing. Use the Edit panel to adjust the image to an exact size. Then click "Go" at the top of the page to move to the Mat Preview Screen.

The image will appear on the virtual mat, ready to cut. You just push "GO" and follow the directions.

If you want to cut multiples of the same item, this screen is where you can tell the machine to cut as many as you want. The items will be automatically placed on the mat.

Some of the things you are cutting could probably be made to fit in a smaller amount of cardstock. You can click on an image and move it around on this mat. You can also swivel the image to any angle and move it to a place where it will cut but also save a large piece of paper for another project.

Once you have the items moved into a smaller area, you are ready to cut (you could skip this step and just use more paper but I like to conserve as much as possible).

Click "Go" at the lower right of the screen and then load your mat, check your cut setting, and push the "go" button on the actual machine to start the cutting.

I chose a simple one layer shape for this tutorial but the steps are just the same for a more complicated layered file. This chick uploaded with full color and all of the layers separated.

The chick is from the "This is the Life" set and I am planning to use it for an Easter or Spring card.
I hope that helped - please leave a comment if you have any questions.
Don't forget to shop the Lettering Delights sale before it ends today - check out the great savings on Cricut cartridges and images HERE and check back at noon to get the special code for the one day sale on True Stamp 2014 - you will save $48 off the regular price.
One quick personal note - Happy Birthday to my sister Margie on Wednesday! Have a wonderful day!
Subscribe to Capadia Designs if you would like to have new posts delivered directly to your email.
This post may contain affiliate links. If you purchase a product using the link I may receive a commission. I only participate in affiliate programs for products that I use or can recommend without reservation
thank you so much for this tutorial. Your documentation is amazing! very easy to follow. Thank you for taking the time to do this.
ReplyDelete