Saturday, November 29, 2008

Pine Branch Card Front (adjustable)


Thanksgiving has come and gone and now we are in the unusually short stretch from Thanksgiving to Christmas - only four weeks this year! Earlier this month I gave a sneak peak at this design and now I finally have a chance to post it. I think it makes a lovely holiday card.

This is a simple adjustable design made from just two elements. If you want to make this using another element in the center you can follow the same method I used for the adjustable snowflakes in circles (here is a LINK to that post).

The file has three copies of the design sized appropriately for some standard card sizes but you can adjust this file to suit other projects. It lalso looks nice as a full scrapbook page background. Just copy and paste the design to a new page and adjust to the size you want.


Above you can see the A2 card front placed on a 5 x 7 card. I like to try mixing up the sizes to try different effects.


Here is another one of my test cuts. The lower part of the inner frame was torn a bit in the cutting so I trimmed it and left the pine cone "hanging" from just the top bars.


Above you can see the 5 x 5 card size placed on a 5 x 7 vertical card. These are plain photos just to give you a few ideas of sizes and placement. You could cut a phrase for the greeting and add it to the card front.


Here is a 5 x 5 card with the square design. I used a Versamark embossing pad and sparkle embossing powder to get this effect on the plain white card stock.

Have fun with this one - I love the frame from Graphically Speaking and plan to use it for many more new designs. It always pays to spend some time "browsing" the carts for some of the surprising elements that can be used in new ways!

Pine Branch Card Front (A)

Wednesday, November 26, 2008

Blog Celebration - and the Winners are....


Thanks to all who joined in the celebration! I appreciate your comments and feedback on my blog.

This morning, when I checked my email before meeting my friends to walk, I popped over to the blog and the blog counter said...


What are the odds that I would check at just that moment?

The feed info showed


and the comment line on the blog celebration post


Do you see why I think threes and sevens are lucky - they just seem to follow me around!

So..... I knew it was time to draw the three winners!

When I got back from walking, I printed out all of the comments on the blog, on the post on the Cricut message board, in the Guestbook and added the names from a few emails I received from people who couldn't post any of the other places. I then numbered all of the entries.

My son did arrive home from college last night and I planned to have him do the drawing, but, in true college student form, he is sound asleep now, so I went to "plan B" and used the random number generator rather than waking him up to draw numbers.


These were the numbers generated and by my numbering on the various printouts - the three winners are

106 - Holly - hollywood77 - how funny is this (I am pasting in her comment here)

Anonymous said...

what a great rak....those little boxes are so cute! its funny that I'm posting this comment today, because when we head out to church in a little while, my mileage will click over to 77,777 =)

Holly(or hollywood77 on cricut MB)

November 22, 2008 9:06 AM

49 - Melissa Misses Texas (notice the time of her post!)
Anonymous Anonymous said...

Capadia, I love love LOVE your blog and check it quite frequently. It's chock full of information and I've learned so much from you. Thanks for everything you do for all of us!!

MelissaMissesTX

November 21, 2008 7:17 AM

and 54 - Swimmom (okay no threes or sevens here...)
Blogger Swimmom said...

congrats, Cap! I have one of those boxes filled with photos and i love it! What a great idea to use one for CB folders or overlays/carts!
thanks for all you do!

November 21, 2008 8:25 AM

Congratulations to the three of you - please email me at capadiadesigns@gmail.com with your mailing address and I will get the boxes sent to you (probably not until Friday due to holiday preparations around here).

Happy Thanksgiving!

Sunday, November 23, 2008

Adjustable Snowflakes in Circles (a step by step tutorial)


I keep getting questions from readers on how to weld the snowflakes inside circles and make them adjustable. Today, I finally had a chance to do a step by step picture tutorial for all of you visual learners!

In this example, I used the silhouetted circle from Mini Monograms and a snowflake from Joys of the Season. Earlier this week I posted a list of carts that have some sort of silhouetted circle - here is a LINK to that post. You can put any element inside the circle by following these steps but since everyone liked the snowflakes I used one again for this lesson.


You can see the highlighted keys above showing how to select the silhouetted circle on Mini Monograms. Since this circle is intended to be used as a layer for the shapes on the lower right corner of the keypad I recommend checking "real dial size" which will make the circle the actual size you select on the slider bar. Since you are only using two elements you can choose a large size which makes it easier to see the details as you work.


Above you see the 4 1/2 inch circle on the mat - notice the "handles" and the light gray line connecting them - this is your "selection box."


Above you can see the keypad showing the snowflake I selected from the Joys of the Season cartridge. You could use many of the other designs as well - I did the menorah, Star of David and dreidel for a friend.


You can start off by clicking somewhere on the mat to deselect the circle and then choosing the snowflake at the same size. You can probably tell at a glance that this is too large to fit in the circle.


Using the handle on the center left you can slide the snowflake over to the side to place it on top of the circle - it is clearly too large to fit (but I think this also would be a pretty design to cut!).


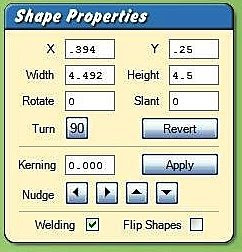
Making a guess, you can try a smaller size - here I "auditioned" a 3 1/2 inch snowflake. Preview this design, making sure that the weld box in the Shape properties box is checked for both the circle and the snowflake.


If you look carefully at the image below, you can see that the dark lines which indicate the cutting lines show that there is not enough overlap of the shapes for a weld to work using this size for the snowflake.


So, try the next size up on the slider bar - 3 5/8 inches. It is important to use the slider bar to set the size because you will not be able to adjust the snowflake you want to weld by the handles since it will be in a combined design box.


Above you can see that the test preview of the 3 5/8 inch snowflake shows that there will be a good weld - the six points all overlap into the circle enough to connect the elements.


Now that you know what size snowflake you need, you are ready to make the design. Leave the trial snowflake in place and click anywhere on the circle to select it.


Then, make sure that the slider bar is set at 3 5/8 and add the snowflake. You will have one large box surrounding these two elements as you can see above. Double check to be sure you have the "weld" function checked (you should still have it on from previewing the circle and snowflake welded as independent elements).


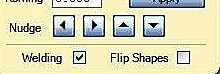
Now, use the "nudge" arrows (shown above) to move the snowflake into position.


Click on the left nudge arrow repeatedly to move the snowflake over to the left. You can hold down the arrow key and make the snowflake move continuously but there is a tendency for the arrow to "stick" which means that the snowflake will become unstoppable! If this happens, click somewhere else on the mat, save your file and then close the Design Studio program. You will need to wait for it to reload, but then you can reopen the file and pick up where you left off.


Once you have nudged the snowflake into position horizontally it will look like this - now you just need to use the "up" arrow to place the snowflake into the final position.


By leaving the "trial" snowflake in position, you have a guide for the final placement - above you can see the snowflake completely nudged into position (it has almost disappeared on top of the trial snowflake).


Using the handle at the center left of the selection box, you can slide the circled snowflake to the right. The circle and snowflake will move as one unit, leaving the trial snowflake where it was placed on the mat earlier.


Above you can see the completed design after hitting the preview key - you can tell by the dark lines that the shape will cut correctly.


Now, you can delete the trial snowflake from the mat.


Next, while the new design is selected, click the copy button in the left column,


and then click the paste button.


A second snowflake will be pasted directly on top of the design. You can see that the lines are a bit darker, showing you that there are now multiple snowflake designs.


Using the left center handle, slide the newly copied and pasted design to the left


Then using the handle in the lower right corner you can resize this design.


Copy and paste as many times as you like and change the sizes to whatever you want - you can now make your own blizzard of matching snowflake designs in various sizes.

Let me know if this explanation helps you make this type of design using the cartridges that you own. Once you have mastered this simple design, you can apply the same principles to make adjustable designs containing many elements. Have fun and let me see what you are making!

Saturday, November 22, 2008

Aperture Cards - the easy way!


Quite some time ago (before the August update of the Design Studio software) I figured out a way to weld letters or an image in the center of a oval opening on a card. The old posts can be found HERE, HERE and HERE and involve using a sequence of steps to produce the opening. These older files were done with George and Plantin Schoolbook and the font of your choice. You can still use this method, but there is an easier way with many more options available to you now.

With the August update there was a change which allowed us to weld inside an existing frame and this opened up a new world of possibilities! Many of the cartridges have some predesigned cards with cutouts - most notably the Beyond Birthdays cartridge with a huge variety of shapes and positions of the cutouts available. Quite a while ago Drew from the Cricut message board suggested that I do a blog entry about the Beyond Birthdays options and recently several people have been asking about the monogram cards so here are some tips on making these cards.

Here is a screen shot of the Beyond Birthdays keypad - you can see that there are many choices to work with - the one I used is highlighted here.


After choosing this shape I altered it a bit to fit the standard A2 dimensions by entering the correct values in the Shape Properties box.

In order to be efficient in the use of your paper, here are a few tips I have worked out. If you want to cut A2 notecards (4.25 x 5.5 inches or one half of a standard 8 and 1/2 x 11 inch piece of paper folded) you can do two at a time on the Expression. Place the paper on the mat aligned to the top left corner. Below is a screen shot showing the paper positioning.


I set this up this way so that this file can be easily used for just one card as well - using a piece of 6 x 12 inch paper on any of the machines. You will need to trim the extra 1/2 inch from the left side of the card since the file welds the two card bases together, or start with a piece of paper 5 1/2 x 11, or you can adjust the file to a 8 1/2 x 5 1/2 card size placed at the top left corner (0 for the X and Y values in the Shape Properties box).

I also made the card forms a bit larger than the desired size to prevent any cuts on the edges of the paper due to inaccurate paper placement on the mat- I find it is simpler to just cut the sheet in half after removing it from the mat. In the screen shots below you can see that the black cutting line is outside the limits of the piece of paper


The card blanks also overlap in the center of the sheet of paper as you can see here - since they are welded these lines will not cut. They are positioned to center the ovals in the individual cards.


If you want to avoid having to rotate your center word or image and you have the Expression you can set up a new file with the paper centered at the top of the mat between the 1/2 inch and 11 and 1/2 inch marks as shown below.


I included a working page for designing the word or image to be place in the center of the opening - this one has the card oriented vertically so you can work with the letters more easily in the horizontal format and then rotate them when you are ready to build the card.

NOTE: If you are placing a single image or letter in the opening, it does not matter if you add the letter first or the card shape with the opening. The weld will work correctly either way. If you are placing several letters or images in the opening you need to place the letters first and then put the card shape "on top" of the letters - it seems that way the software works the first thing on the mat is welded first and you will get garbled letters like this if you put the card down and then add the letters.


This would produce a cut like this - not the effect you wanted!


Here is a screen shot of the correctly welded design - done by first adding the letters and then the card form. You can see by the dark lines that this will cut correctly.


After cutting you will have a full sheet of paper with the two cards - simply cut this in half and score to fold the note cards.


When folded they look like this...


You can add backing paper to highlight the cut and make it easier to write a note inside(!) Patterned paper gives a nice effect, vellum accentuates the cut even more and embossing the backing also looks lovely.


(These are not finished cards - just photos for illustration).

I am posting the file I used to do my cards with some notes on the tabs about how to use the file. Just delete my name and initials - they were left to help you see how to place the center images (unless of course your name is Diane or you share my initials!).

You can try lots of various shapes and sizes - some other carts with possible cards to use are Alphalicious, Don Juan, Going Places, Joys of the Season, Locker Talk, My Community, New Arrival, Paper Pups, and Zoo Balloo. (These vary in how useful they are - some have many and some only one or two cards shapes to try).

Easy Oval Aperture Cards

Thursday, November 20, 2008

Blog Celebration!


If you have been reading my blog for a while you may know that I like to make symmetrical designs, I try to plan designs to make the best use of the paper and to find creative ways to use the offcuts, I want to be organized (but it is sometimes a losing battle!) and my favorite numbers are three and seven.

Last night when I was working on a blog post I looked at the counter and it was....


That seemed like a lucky number to me! So I started to figure out what I could give as a prize for a blog celebration. I have been working on getting my house sorted out. We have lived here for a bit over eight years now - the longest we have lived anywhere since we were married -and one of my many projects includes getting our family photos completely organized and scanning the older ones so I can work with them digitally.

My husband just built shelves for me in the guest room closet and this will be my "photo and video organization station." I have a folding table that fits perfectly in the closet and this will be my work area as I finally get this project completed. (I'll post photos once I have it a bit further along - I am still setting things up).

I am also a Creative Memories consultant and use many of their great tools to help me organize. I plan to store the photos that are not used for scrapbooks in my large Power Sort boxes to keep them safe from dust and light and easily accessible. I have four of the large boxes full already (they each hold 2400 photos!) and many photos still to file.

The regular Power Sort boxes are plain black but, for a while there was a special Memory Keepers Club prize of a Mini Power Sort box in brown with a cute pink design and three lidded compartments. I happen to have a few of these left on my shelf and I have discovered that they are perfect for holding more than just photos (about 600 - up to 5 x 7 size). The compartments are also great for Cuttlebug folders and will even hold Cricut keyboard overlays and handbooks (as you can see in the photo below).


So, I'd like to help a few of you get organized too! I have three (3) of these boxes to give away by a random drawing. This morning the blog counter said


funny how those 3s and 4s add up to 7 - or am I just a bit too obsessed with patterns?

If you want to get organized - in a pretty pink and brown way - leave a comment on this post. You just click on the "comments" at the very bottom of the post and leave your name (real or message board) - if you don't have a Google account, you can check "anonymous" to leave your comment - but please be sure to give a name in the comment so I can identify the winners.

Some readers have mentioned that they have trouble leaving a comment on the blog - even with the anonymous posting option - so I will also start a thread on the Cricut Message Board and LINK it here - if you can't post a comment on the blog you can reply on that thread to be included in the drawing.

Last time I did a blog celebration you needed to make a card using one of my designs - there is no card to complete to be included this time since everyone is super busy with their holiday projects. Just leave a comment or respond on the message board thread if the comment function won't work for you.

Thanks for visiting my blog and keep watching for details about my new teaching blog where I will be doing online lessons and more specialized projects.