Friday, May 30, 2008

And the Winners are.....

Well, I was waiting for my son to wake up and draw names for me but, since he is on a college student schedule, that didn't happen. I decided to use the random number generator I have seen others using to "pick names from the hat." I went through the message board thread for my challenge and listed all that made and posted a card in order (except from Brens_Designs since she asked not to be included in the draw) and numbered them - there were 24 individuals (sorry multiple cards did not get multiple numbers).

And here are the results!


Gift #1 (the 7 x 7 stardust album and stickers) vwslugbug (#6)

Gift #2 (the maple and oak leaf hole punch) RamonaTemple (#2)

Gift #3 (the set of four page templates) CindywithanI (#15)


Thanks so much to all who participated - I am glad that you were willing to give this a try and I think it is interesting that the winners are all newbies (less than 100 posts) on the Cricut Message Board (so maybe my plan to encourage you worked!)


I also found another lucky number when I checked the blog today - the hit count was at 44437 - combining my favorite numbers with triple 4 (which my younger son claims as his number!).

If you would like to see all the creative ideas people came up with click HERE to go to the message board thread where the cards are posted.

I will be doing more challenges soon - now I must finish my latest swap!

Sunday, May 25, 2008

Karen's Gazebo


Karen, a blogless Cricut message board member, designed this gazebo and wanted to share the file so she asked me to post it on my blog. I think she did a terrific job on this - she said it made her feel like a builder! The cartridges she used are George, Plantin Schoolbook, Accent Essentials, Speaking of School and Dreams Come True (I think that is a complete list). I have not test cut this file but you can see her result above - very cute!

Here is her file - please remember to give credit where it is due - to Karen, not me!

Karen's Gazebo

Tuesday, May 20, 2008

Recipe Swap Layouts (with files)


I recently participated in a recipe swap on the Cricut message board - I signed up for two groups which meant I had to make 15 each of two layouts . We had to use at least one Cricut element for our layouts and there was a contest for the most elements used on a single layout. I did my designs using the Design Studio software and making only one cut (composed of many elements) for each recipe. The swaps have been received by all participants now so I can "reveal" my designs and share my .cut files.

I did the actual recipes using my Creative Memories digital scrapbooking software - StoryBook Creator Plus (I highly recommend this program and you can contact me if you do not have a CM consultant and would like more information about it).

The first recipe I chose was my mother's Gingersnap recipe. She was "famous" for these Gingersnaps and probably made tens of thousands of them in her lifetime. We would give them out for Halloween treats (back when you could do that!) and parents would raid the trick or treat bags for the cookies! I have so many memories of rolling the dough into balls and then in sugar and I have continued the tradition of making gingersnaps with my sons. This is truly a family favorite.


I used a background of CM digital paper with a nice shade of blue and polkadots and add the recipe in a text box that I floated on a white square. I changed the opacity of the square to make it more like vellum, added a blur to the edges and then at the four corners I added digital "stickers" of three gingersnaps for a photo corner effect. The "stickers" are made from actual photos I took of gingersnaps that I made with my son. I then copied, rotated and "grouped" together the individual gingersnap stickers.


My Mom collected china and glass (lots of it!) and one type of serving plate she had was glass and had an open circle design at the edges. I designed the "frame" for the recipe with this plate in mind. To make it "pop," I used the Cricut markers to outline the design - I used brown to coordinate with the cookie color! It took quite a while to do 16 of these (always make an extra one...) but I got into the rhythm of cut, ink, ink, cut, and had two mats going all the time. I used Plantin Schoolbook and Stretch Your Imagination for the frame design.

The second recipe I chose was one that my husband''s mother gave me many years ago for a quicker sort of apple pie - no crust! Apples are a big favorite in our family since my father in law grew up on an apple farm, and we all eat a lot of apples.


For this recipe I decided to make a circular "frame" around the recipe using a ring of apples. I wanted it to fill the page as much as possible and discovered that I needed to have the apples move up and down in the ring to fill the space in the most attractive way. The apples at the four compass points are "shorter" than the apples in the diagonal corners. I liked the font I chose for the title - I thought it had a "Swedish" sort of Arts and Crafts look. The font is called "Chelsea Studio." I used George and Makin the Grade for the apple ring design. There is a second mat with 16 apples that can be cut to overlay the ring - I liked it better without the contrasting apples for this project so I did not use them.

Here are all my completed layouts on my kitchen table before I shipped them off for the exchange.


Here are all of the recipes I received set out on the same table - I think they look like a quilt!


Here are the two files I created for this swap

Gingersnap Frame of Circles

Ring of Apples

Sunday, May 18, 2008

Blog Celebration & Challenge - with Gifts!


My favorite numbers are three and seven. A few days ago I checked my blog and noticed that the visitor count was a very "lucky" number and the subscriber count and guestbook signatures also had lucky numbers


So...I decided to have a bit of a celebration!

I had been working on the designing the file you see pictured at the start of this post for a lace edge card (after creating some cuts that mimic punches I decided to work out my own pattern). I created this in both George in an A2 size


and Plantin Schoolbook in both A2 and 5 x 7


so that anyone with either bug and the trial version of the software could give this a try.

Here is the Challenge!

Create a card using one of these files and post it on the Cricut.com message board in this thread BLOG CELEBRATION AND CHALLENGE

Since I did not get this posted until Sunday afternoon (and next weekend is a holiday weekend -Memorial Day in the USA), I will give a deadline of Wednesday, May 28th to post the card you create. There are three prizes - you can ask to be in all three drawings or choose the ones to enter if you already own one of these gifts.

I will put slips of paper in three cans with the name of the each person who posted their interpretation of my card - if no choice is given you will be entered in all three drawings. I will post the winners in my blog and on the message board on Thursday, May 29th.

So what could you win? As you know I am a Creative Memories consultant and there are a few limited edition items that I love and in cleaning my scrap space I found that I happen to have brand new extras on hand. I will send one of these to the person whose name I draw from each can.

The first gift is pictured here - it is an adorable 7 x7 seven album in a pretty shade of lilac with a beautiful sparkling star on the front. The album has 12 white pages (24 sides) and I am also giving a set of the Fairies and Frills stickers that work well with this little album.


The second gift is a wonderful hole punch that cuts a detailed maple and oak leaf and comes with a plastic storage container for extra punched leaves. I know that I am often create files that imitate punches but I still do use punches in addition to my Cricut and this is a favorite for the beautiful detail of the shapes.


Finally, I have a set of templates for journaling, page decoration and page layout that were an exclusive gift for hostesses and are extremely versatile. There are four templates and they are great for adding some interest to your pages and some parts could even be used for cards (stickled flower and swirl shapes, etc.)


All of these items are no longer available from Creative Memories and they are hard to find.

Show me that you actually do use my files after you download them!

Use your imagination to create something unique with one of these files. I purposely cut the samples in plain ivory card stock so you would have a "blank slate" to start from.

Here are the links to download

Circle lace edge A2 card - George

Circle lace edge A2 card - Plantin Schoolbook


Circle lace edge 5 x 7 card - Plantin Schoolbook

Good luck - I look forward to seeing what you create!

Wall Words on the Window


I helped a friend do a bit of decorating for the traditional senior class Faculty and Staff Appreciation Luncheon at our high school. I used Wall Pops and the Alphalicious font at six inches for most of the words. I welded the "Class of" at a four inch size and also welded the "from the" at a 2 inch size. The apostrophe for the "'08" is actually the top part of the exclamation point sized to look proportional.

I had the electric blue wall pops that had been on special at Lowes on hand and by using the Design Studio software I was able to fit the letters together and use only 8 feet of the 6 1/2 inch roll so this was a very economical project. I wasn't sure about the color since the theme was a sort of western picnic but we found that it was almost and exact match for the blinds in that room - a bit of serendipity!

No file here - just another example to show you of vinyl lettering - it was very easy to apply to glass and will come off without leaving a residue (though a quick cleaning will probably be needed for fingerprints!)

Saturday, May 17, 2008

Castle Card


The Design Studio software opens up so many possibilities for creating unique cards. There are many shapes that can be used to make interesting "shaped cards" for all occasions.

I created this card with my neighbor to help her get started on using the software - I will explain how we did this step by step to help others learn this simple technique.
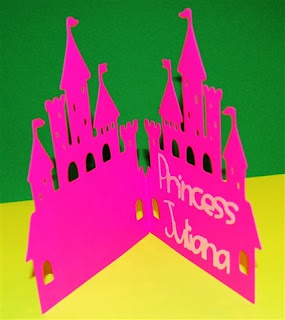
Here is the inside of the card


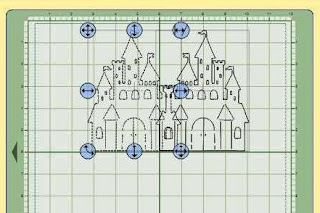
To create a card, find a shape you would like to use and place it on the right side of the mat - we used a castle from the Paper Dolls Dress Up cartridge.


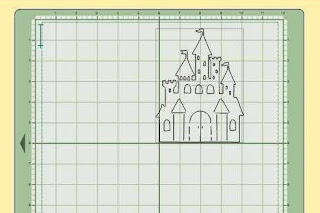
Click "weld" in the shape properties box while the first castle is selected. Then copy and paste the castle image using the quick buttons at the left of the screen (second and third from the top)
Then click "flip" in the Shape Properties box at the top right of the screen (both "weld" and "flip" should be checked on the second castle).


the result will look like this


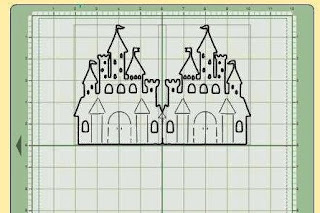
Select the top "flipped" image and use the blue "handle" in the center of the left side to pull the image to the left along the horizontal axis


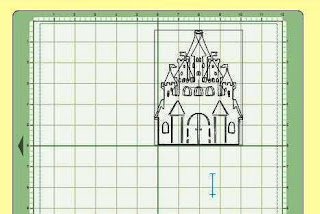
Move the second castle into position so that a symmetrical image is created and preview to check the cut. You will notice that the interior detail lines appear "grayed out" - this means that they will not be cut - leaving a solid area for your message


By using the 200 view you can check the center weld - here you can see that due to the shape of the castle there will be a cut going up about 1/2 inch from the bottom of the fold.


To minimize this, find another shape to weld on top of the area that you do not want to cut - try to use something on the same cartridge - for a bit of fun I chose the canoe to demonstrate! Be sure to click weld after selecting this filler shape.


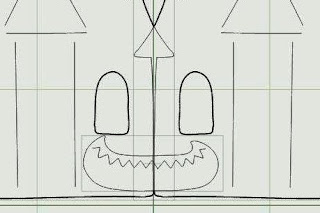
The canoe is entirely "grayed out" and will not cut but will weld the two sides together in the area we wanted to cover - I left it up a bit from the base to make the scoring of the fold of the card easier (the line will be more obvious because of the little notch).

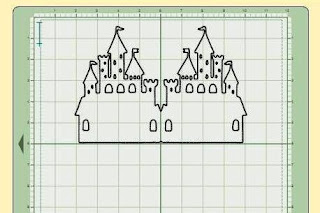
Preview the new cut by clicking on the "eyeball" (second from the bottom of the left buttons)


For a clearer view, click on the top button for a new page and preview on that page - it will look like this


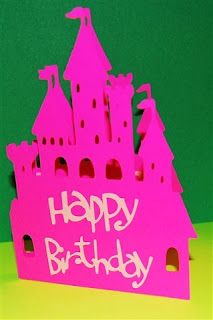
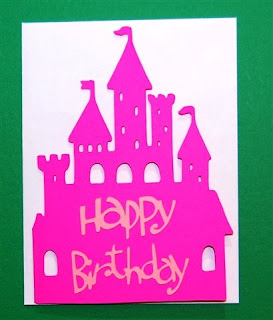
We decided that the font from ZooBalloo would be a good choice for this card (there was also a pre-made "Happy Birthday" phrase on that cartridge), but you can make your words in whatever font pleases you. You can use pre-made words, weld your own words or do your own lettering by hand.

I left the second page of the file intact so you could see the approximate size for the words that will fit on this card


This card looks cute standing up


and fits perfectly in an A2 envelope


The offcut will be centered and could be used for a scrapbook page - possibly for journaling or as a creative cut out around a photo


Obviously you will need to change the name on the second page of this file which I left for sizing purposes.

Simple Castle Card

Sunday, May 11, 2008

Ribbon Threading Variations


Once again, I resisted spending money on a hole punch because I was convinced that by using Design Studio I could create a .cut file which would achieve the same effect. Many people on the Cricut Message Board have mentioned the Martha Stewart ribbon threading punch lately. It creates a series of slots to thread ribbon through on a card or a scrapbooking layout.

The trickiest thing was getting the size right - here are my first attempts - the holes are a bit too big!


So I went back to work and found the best dimensions for one eighth inch and three eight inch ribbons.


I also created a file for smaller intervals between the holes for the one eighth inch ribbon


I designed this file to avoid the "uncuttable" area on either the baby bug or the expression mat I needed to position the cuts in a way that would result in slightly uneven spacing on a full 12 inch strip of paper. You can compensate by placing the paper a bit to the left as you see here


You can also vary the distance from the edge by moving the paper up or down.

I didn't want my first attempt to go to waste so I tried threading five eighth inch ribbon through the half inch holes on one of my first files - you can use this if you like a more puffy effect. The ribbon in the lower part of this photo was unlabeled but it apparently is a bit wider than three eighths inch so there are smaller gathers at the edges.


These files can be used for cards - simply place the card in the area of the mat where the spacing works for you. Once again there are endless variations!

I designed these using George on the baby bug mat - if you have the Expression they will also work because I set the file up to avoid the slightly larger "uncuttable" area on the Expression mat. You will need the George cart until I get a chance to do some files with Plantin Schoolbook (this time I did George first).

You can also just make your own file by copying these using the Plantin Schoolbook rectangle - check the Shape Properties box on my files for the sizes and placement of the rectangles. Then you can create further variations by changing the spacing as you please.

This file has four pages - each page is labeled to indicate which cut it will make.

Ribbon Threading - George

Saturday, May 10, 2008

Check or Money Holder (baby bug version)


Thanks for waiting patiently for this one - as promised in my last post here is a version of the check or money holder made using only George and the baby bug.

Since the baby bug mat is not wide enough to cut this in one piece there are three pages to this design. The first page cuts the back and flap of the holder and the second page cuts the front of the envelope. To make a window for a cash holder, cut the second page, leave the mat in the bug and then cut the third page.

When scoring the sides of the holder you can follow the lines of the flaps, making the score exactly even with the cut edge.


To score the long line which forms the flap, you should score at 2 3/4 inches. If you use a Scor-Pal shift the paper to the 1/4 inch mark and score on the three inch line (see below).


The piece for the front on the holder should be scored at the half inch mark - I am right handed and find it easier to do this on the right side of the Scor-Pal (so my left hand can hold the paper steady).


You will have two pieces that look something like this.


I used my Creative Memories Precision Point adhesive pen to attach the two pieces - you need a strong bond to be sure that the bottom of the holder does not open up. Here you can see it ready to adhere - the color has changed from white to clear.


Line up the fold line with the bottom of the larger piece and adhere


then apply adhesive to the flaps on the larger piece and fold the front down on top of the flaps.

Here are a few more ideas on decorating these holders .

First I tried some more embossing - inserting the front flap into the embossing folder as far as possible - first on one side and then the other. This results in "overlapped" embossing that looks a bit muddled and odd in the center of the holder


So I embossed a 1 3/4 inch strip of contrasting paper in the same folder and adhered that to the front.


You can see in the above photo that the embossing did not quite reach the bottom of the back of the holder so I added a strip of the same color paper (unembossed) to cover that area


Here is the finished money holder


For another holder I used some leftover flower cut outs and a strip of paper as decorations. First I punched 1/8 inch holes in the strip and the flowers


Then I attached the flowers to the strip using eyelets


I adhered this strip to the front of the holder and turned up the petals on the flowers


You can also simply tie a ribbon around the holder - here I used 1/8 ribbon cut to a length of about 20 inches. Thin ribbon will keep the holder closed without crushing the paper.


There are so many possibilities for decorating these holders - adding names to personalize them, stamping on the front flap, all sorts of embellishments will work so just let your imagination go wild!

Check or Money Holder - George