Thursday, August 28, 2008

Wedding Hearts (Larger) - by request


I had a request from a blog reader to alter the four wedding hearts design I posted in June (here is a LINK to that post) to better fit a slightly larger card (5 1/2 x 8 1/2). She wants to use it for a special wedding card. Even with the new update to the Design Studio Software I can't make this an "adjustable" design because the elements I used to create it must be rotated (at this time, it is not possible to change the rotation of an element within a selection box).

So I enlarged two of the hearts and fit the four together again for a new card front. There are gaps between the hearts and I used some other shapes from the Wedding cart to fill them in so you only need the one cartridge to cut this design.

Here is the card - with no embellishments added. I cut the design from metallic silver cardstock.


If you take care in the placement of the paper for the cut and you also are very careful as you remove it from the mat and save the off cuts you can create a second card like this one - the design can be used vertically or horizontally


If you don't add back the center pieces from the cut you can have a card with a small opening as shown below (sorry for the odd difference in color in the photo)


You could add some writing, a stamp or an embellishment in this space - here is a photo with a chipboard accent added (many thanks to another online friend for sending me a bundle of goodies including a set of these yesterday). Keep this card simple or add more sparkle and embellishments - so many possibilities!


I hope you enjoy making cards using this design - I'd love to see some of them when you are finished! You can always contact me at capadiadesigns@gmail.com.

Four Beautiful Hearts Large card size

edited 8-28-08

Sunday, August 24, 2008

At the Drive In


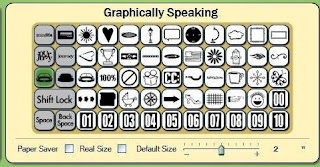
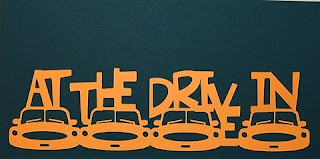
I enjoy looking through the cartridges in Design Studio and finding something to inspire me to make a design. On the new Graphically Speaking cartridge the bottom two feature keys show a car image. I looked at this and the idea of drive-in movies popped into my head. I am not sure if drive-ins are very common now, but I have fond memories of going to the drive-in as a child. Even though I don't have any photos of my family at a drive-in, I thought I could do an album page that features some childhood memories.


I built this design in the same way I did the "School Days" from a few days ago. This design is for a border and does not have a frame surrounding the words and images (check the tutorial pinned to the top right of my blog home page for step by step directions).

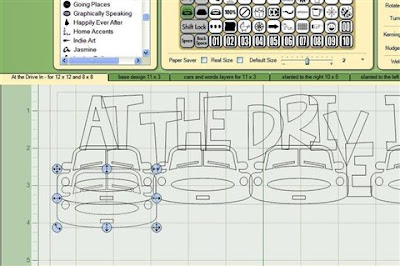
Once you have a design built this way you can alter it by using the handles around the design.


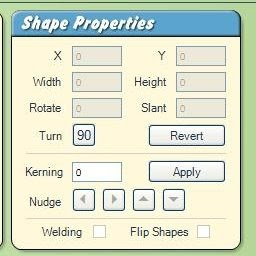
or by entering values in the Shape Properties Box


I thought I would show some examples since I have received some questions about the use of the handles and the shape properties box.

By paying attention to the grid lines on the mat you can easily stretch the design using the lower right handle to preserve the aspect ratio (the design will stretch proportionately by height and width). The two designs below were sized for a 12 x 12 and an 8 x 8 page layout.


If you use the center bottom handle, you can stretch the design vertically - it would look like this


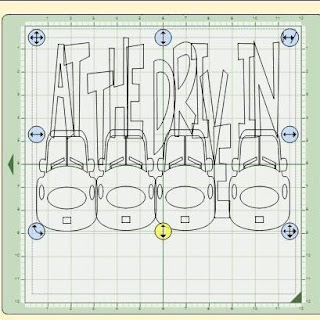
If you use the handle on the center right you can stretch the design horizontally and it would look like this (mat view switched to 12 x 24)


By using the handle in the upper right corner you can skew or tilt the image to the right


or to the left


The lower left handle will rotate the design


If you "lose" the placement handles which move the design in "any direction" (top left handle), "vertically only "(top center) or" horizontally only" (left center), remember that you can use the arrow keys on your computer keyboard to get the design back on the mat and into a position where you can work with it.

You can also move the design by entering values in the Shape Properties Box


This is particularly helpful if you know that you have a certain space on a scrapbook layout or a card front where you want to use the design. Just select your design, type the desired measurements in the width and height boxes and click anywhere on the mat for the values to be applied.

One IMPORTANT note - do not use the "Apply" button after you select the sizes you want - this is used only for kerning. If you look carefully, you will see a fine gray line separating the kerning area (which includes the nudging arrows) from the top part of the box.

If you hit the kerning "Apply" button when you simply want to alter your shape your design will "jump apart" and you will have to move the elements back into position (which can be tedious).

This is another reason to save frequently and to use the "save as" option to save into a different file every so often as you work with the design. You will then be able to go back to a partially completed version of the design if you forget and hit "apply kerning" at the wrong time or run into the "sticky nudge button" problem which I mentioned in a few previous posts. (Once that nudge button goes into overdrive there seems to be nothing you can do to save the file - any element you click on will "drift" in the lasted used nudge direction and the file seems to be permanently corrupted by this).

So back to this design....

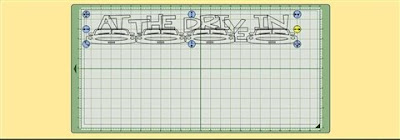
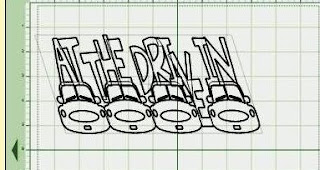
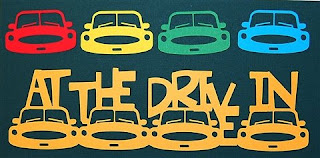
Here you can see the full cut - this could be used in one color but I thought it would be fun to make the cars all different colors.


In order to do this, I had to "back them out" of the design by selecting the grouped image and hitting "Backspace" (NOT "delete") four times since the cars were the last four items I added to the design. This gives me a layer for the words only (which I did not use in the photographed example - I simply chose a base color that I wanted to use for the final design).


To cut the four cars I need to add them to the mat as individual images. If you have adapted your design to a certain size to fit your layout, you will not simply use the same object in the size you originally chose since it may no longer be a perfect fit.

You should select the same object and place it directly over the part of the welded design where that object appears - then, by using the handles on this separate element you can adapt it to be a perfect layer for your new design.

Here is a screen shot of the car which has been sized to be a perfect match and then moved off the design to be placed separately for cutting.


Make four of these by copying and pasting and then you can set up your mat for cutting everything at once.


The cuts on the mat after "weeding" the outer paper.


and the final base and layers


I wonder if any of my blog readers remember the drive-in movies - let me know if you do! (or if they still have them in your area...)

At The Drive In (A)

Sweet Baby


My niece just had her second child and with the updated design studio software I was able to create this "grouped" design. I can use it for a card (the photo you see is the cut on a standard A2 (4.25 x 5,5 inch) card and I can also cut it to fill a 12 x 12 page. The letters and frame are from the new Storybook cartridge - I see many hours of designing with this cartridge in my near future - it is full of great images and frames and the fonts are very "fancy" and fun!

There is a bit of extra space in the lower right corner - I thought that might be a good place to add a flower or other embellishment - but I leave that to your imagination!

There are multiple copies of this design on two pages in the file and you can copy and paste to make as many as you like in whatever size you need for your projects.

I am labeling posts that have these new "grouped" designs as "adjustable designs" and will put an "A" after the file name in the download link if it is an adjustable one.

Sweet Baby (A)

Good Luck! (another adjustable design )

adjustable designs, C - Storybo

Here is another design I created using the new method of "grouping" possible with the 08-08 Design Studio update. The update can be found on the Cricut website - here is a LINK to the page - be sure to follow the directions. The link to the tutorial on grouping is pinned to the top right corner of the home page of my blog.

I did this design using the new Storybook cartridge. Here is a screen shot of the design on a 12 x 12 mat - this is on page one of the file.


On page two you will find a few other sizes, however, the exciting thing about these files is that you can make them whatever size you need!


Just select the design and use the handles or the shape properties box to resize it - I have a longer tutorial about this that will be posted later today or tomorrow.

Here are two cuts made from this design, side by side so you can see the relative sizing - the one on the left is on a 12 x 12 sheet of paper


Below is a photo of the cut on the right on a precut 4 1/2 x 6 1/2 mat - perfect for a 5 x 7 card.


The offcut on the 12 x 12 mat leaves a border that could be use on another page layout


You could add some additional pen lines, stickles or other embellishments to the green border.


You will also have four "clovers in circles" that you can save and use somewhere else.


I like the look of this using two shades of green as seen above.


I thought I'd also share a photo of my new favorite tool! It is a three inch wide putty knife that I got at Ace Hardware.


The width is very convenient and the long handle give you good leverage for getting under the cuts.


The angle of the edge is also great for removing the paper - it is thin enough to go under easily and sturdy enough to stay stable.


Best of all - it only cost $1.39

Not all designs can be grouped under the current version of the software - it is not possible to alter the angle or stretch or skew an individual element within a design. Even so, I am really enjoying the use of those two extra nudge buttons! Be careful to save your design frequently as you work (using "save as"" to create a new file) because many people, including me, are having a problem with the nudge buttons "sticking" and then the file goes out of control and becomes unusable. If this happens, you will need to close the program and reopen it, however, the version of the file that had the "runaway" nudge will not be cured, so delete it and go back to a prior saved version to continue. Once you have a final file, you can delete all of the extra backups.

I will be adding (A) to the download link for a file if it is an adjustable file - as always the cartridges used are in the title of the file which you download and in the labels below each post.

Good Luck (A)

Saturday, August 23, 2008

Olympic Rings


The Olympic Rings helped me to figure out how to weld and make the resulting design a single unit - I had discovered that we could now weld silhouetted shapes and letters and I was planning to create a file for the rings since everyone is watching the Olympics these days. I tried nudging the lower two rings into place with the up/down buttons and the light bulb came on! The step by step tutorial on how to do this is on my blog post from August 21st - here is the LINK

I have set up this file on a few pages - the first page will cut a full set of rings which are 2 inches in diameter. I cut this in black.


The second page is set up to cut the other four colors (red, blue, green and yellow) individually so you can create a full color set. Here is the mat set up to cut (I actually have two sets on the mat but you can delete the second four if you don't need them - or add additional rows).


I hate to end up with scraps that are not very useful so I planned the placement to cut the rings in the center of a three inch squares - the offcuts look like this and can be used for other projects. (In my sample the two yellow square were a bit smaller - just center them within the mat area for that color to get a circle in a square.


Here are the rings - they are rather thin so be careful when you remove them from the mat if you use paper instead of cardstock for the layers.


The true Olympic rings are interwoven so I checked for an image to be sure that I crossed the colors at the correct intersections. For an interesting Wikipedia article about the Olympic symbols, click HERE. Below is an image of the rings


You need to snip the color overlays and the base to create this effect. Snip each color once


and the base in four places - it is a bit hard to show but if you study the image you will see which color goes under or over.


As usual, I found it easier to apply the adhesive to the base - just be careful not to place any on the center black ring which will not have an added layer. You have to carefully manipulate the paper into the correct position and add a bit of adhesive on the back to hold the two areas where the black rings are cut.


This is very simple and a good project to try on your own to get used to nudging but I am including the file if you are in a hurry to make these! On the third page of the mat are a few extra copies of the design at various sizes.

Olympic Rings

Sugar and Spice - in any size you want!


Here, as promised, is the updated file for the Sugar and Spice design which I have recreated using the new technique for "grouping" that I explained in the tutorial I posted on August 21st. Here is a LINK to that tutorial and I will keep a link at the top of my blog to help those that are just getting started on this new method of welding which produces finished designs that can be copied, pasted, resized, rotated, flipped and manipulated in the same way the a single element could be in the prior version of the software.

One IMPORTANT thing to note is that after you complete the design you should not use the "apply" button in the Shape Properties box after you enter new values in the x and y coordinates or in the height and width boxes. The "apply" button is only for kerning and if you hit it after entering new values in any of the top four boxes it will make all of the elements "jump apart" and you will have some difficulty getting the design back to where you started. For this reason, I would suggest saving a backup file with a few copies of any design you make so you can retrieve one if you somehow hit a control that takes your design apart!

I decided that the cupcake needed a bit of bling so I added Stickles glitter glue for the frosting and cut an additional cupcake in the correct size so that I could cut off the "wrapper" portion (I first tried just adding pen lines as you can see below but I thought more contrast was needed to make the cupcake stand out!


To cut the extra cupcake you need to first size the full design by using the handle in the lower right corner and then click somewhere else on the mat, select the cupcake from the celebrations cart and move it over the design, using the handle in the lower right again to size it exactly the same as the one in the welded design.

Select, copy and paste that single cupcake to a new blank page (and be sure to delete it from the page with the full design) then load a mat with paper, cut the cupcake and trim off the "wrapper" portion (just two small snips as there is a design cut at the wrapper level. I do wish that we had the option of keeping some of the detail lines when items are welded - perhaps in another update?


My favorite thing about this technique is the ability to create a design the would work for a small card, a large card and a full page layout by designing once and then saving and copying and pasting to create a new size for your project.


The cards in this photo are 5 x 7 on the left and A2 (4.25 x 5.5) on the right. This is such a time saver, however, I still hope for a true single click "select all" and "group/ungroup" feature to be added to the program.

Sugar and Spice (grouped)

Friday, August 22, 2008

Wedding rings (by request)


A Cricut Message Board member asked for a file with wedding rings, similar to the one on the wedding cartridge but made with George.

It was a bit tricky to get the angles - this is a "fatter" diamond but I think it will work fine for her card. The file has several pages. Page one will cut the basic shape with no "sparkles" in the ring. Leave the mat in place and click on page two to cut the "sparkles" into the diamond shape.

You can also cut page one as a base in white or black. Then use page three to cut just the diamond (you could try using glitter cardstock). If you want the sparkles cut out of the diamond, do not unload the paper after cutting page three and cut page two. Page four will cut just the rings if you want them to be gold (or another color).


Here is a close up view of the diamond - I used diamond Stickles to highlight the sparkles. If you use textured cardstock pay attention to the direction of the texture and placement (this piece has a heavier line at the bottom and may have looked nicer in plain shiny cardstock).

The size is about 3 inches square and I did this file just before I discovered how to "group" the items yesterday so if you need a different size you will have to modify the file.

Wedding Rings