Monday, March 31, 2008

Scalloped Circles


Just a quick post - working on taxes (ugh!) but wanted to get this up for those who were asking for it. After I put up the scalloped border which is similar to a border punch, someone on the Cricut Message Board asked if anyone had done a scalloped circle similar to another punch. Since I had recently been "scalloping" I gave it a quick try.

My first attempt is on the left - this one had sixteen scallops around the circle. My tester said it worked fine but the punch she was thinking of had smaller/more scallops. So, back to the computer, a bit of math, and I designed another one with 24 scallops.

These are both done with George - when I get a chance I will do a Plantin Schoolbook version. If you don't have George and are in a hurry you can easily figure it out by looking at my George .cut file.

Apparently this punch costs over $20 - so the Cricut again shows how it can be well worth the initial investment! Now if I could only design it once, weld, group and resize! (maybe in the next version of the software). I put the two scallops on two different pages so you can cut only the one you need - once again - if only I could have moved the entire design at once rather than element by element it would have been so much faster!

I hope you can use this in your projects - I'd love to see what you make if you do use it!

Scalloped circles - 2.5 inches

Saturday, March 29, 2008

Scalloped Punched Border


One of the members of the Cricut message board asked me if I could design something similar to a border punch made by Fiskars called "threading water." This punch creates a scalloped edge with a small hole in the center of each scallop. It seemed like a simple task, however, I discovered many complications due to some limitations of the software and the machine.

In order to design in an orderly manner I calculated that each scallop should be 1/2 inch in diameter. The holes in the center should be 1/8 inch in diameter. So, I created a square that extended beyond the left, bottom and right edges of the cutting mat and placed it 3/4 inch from the top of the mat. Then I welded 1/2 inch circles to the top edge of the square, taking care to place them precisely at one half inch intervals on the "x" axis and at .5 on the y axis. The boxes in the "Shape Properties" area at the top right of the screen can be helpful but it is very difficult to get the program to accept smaller dimensions when you are adjusting shapes - if you try to type in something smaller than .5 it will revert to .5 so the only way to get it smaller is by using the "handle" in the lower right corner of the image which enlarges or reduces it and to watch the box for the size you want.

I first designed this in George on the baby bug mat. There is a problem if you want a 12 inch border - the machine will not cut the full length of the paper. An area of between 1/4 and 1/2 inch at the start of the cut and a slightly smaller area and the end of the cut will be in the "uncuttable" area of the mat.

top left (start of cut)

top right (end of cut)

In order to get a full strip of bordered paper you need to use the 24 inch mat on the Expression.

I also was not pleased with the small holes - while the program showed 1/8 inch circles they did not cut as perfect circles as you can see in this photo which shows the holes next to an one eighth hole created by a hand punch - the cricut cuts look like ovals and are not as large.


You can hand trim and try to add a few punches (which won't match precisely) or, if you have the Expression as I do, you can move on and try to figure out a way to get that full 12 inch border to cut!

So I redid the file in both George and Plantin Schoolbook since those who own the Expression would have that cartridge but may not have George. In order to avoid the problem of the cut starting in the "uncuttable" area, I added a few more circles to the designs and placed the paper one half inch into the mat. When I test cut this time I found that the cut started incorrectly - there was a "tail" before a full scallop cut and the final scallop was cut off, as you can see below.


top left - start of cut

top right - end of cut

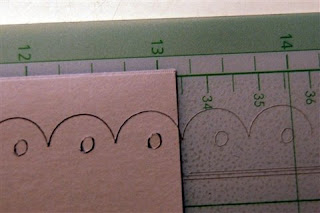
The next photo shows the difference between the 1/2 inch mark on the mat and the start of the cut after I moved the paper for another trial cut (the scraps are positioned on the one half inch and the 12 1/2 inch mark).


Finally - I tried again and started from a bit beyond the one inch mark, using the scrap cut from the original cut to place my paper


As you can see, the paper is a bit beyond the 13 inch mark but the scallops are complete on each end


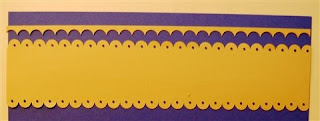
Here is a completed strip with two scalloped edges


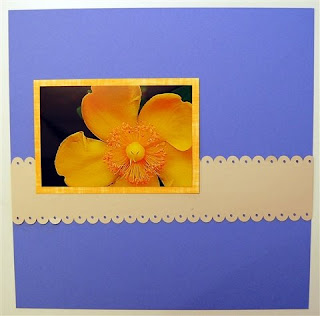
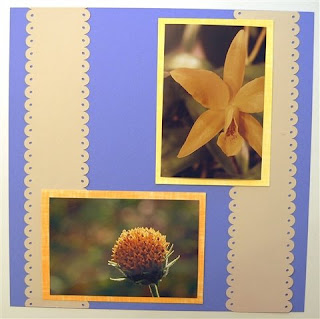
and an example of how these could be used on a layout


I am not entirely happy with the way the machine and the program seem to give you exact dimensions to work with but they don't completely align in reality. The only answer is to do some trials on scrap paper and figure out what works for you on your machine.

Obviously, if you want this edge on a smaller sized piece of paper you will be able to cut it by checking your test cut and placing your paper to align with the exact position of the scallops as cut. I am not sure if the "ovalness" of the small holes is due to their small size - mathematically they should be circles but perhaps they are too small for the Cricut to retain the roundness.

I am posting several variations of the files for you to try - on the smaller mat and the 24 inch mat using both George and Plantin Schoolbook. Test them out for yourself and see if you can make it work for your borders.

Scalloped Punched Border - 12 inch mat - George

Scalloped Punched Border - 12 inch mat - Plantin Schoolbook


Scalloped Punched Border - 24 inch mat - George


Scalloped Punched Border - 24 inch mat - Plantin Schoolbook

Easter treat bags


I really haven't used my Cricut as a stand alone machine since I started using the Design Studio software. These treat bags for some of our nieces and nephews were made using the shopping bag on the Tags Bags Boxes and More cartridge. I used the software to set them up to cut two bags at the maximum size possible on a 12 x 12 inch piece of card stock and to use the remaining space to cut out some small flowers.

I find it so helpful to be able to lay out the cuts that I want and to see exactly how they fit on the paper. Here is a screen shot of the cut


and here is the "leftover" piece after cutting this file which shows how I maximized the use of the paper


When I scored the bag for cutting I found that the paper I was using (DCWV with a white core) was not the best choice for this project. After folding on the score lines the paper "cracked," revealing the white core which made the edges look sloppy.


On this close up shot you can see how distracting these white areas are - not the look I wanted at all!


Fortunately, by reversing the folds and using the "wrong" side of the paper (with a less dramatic texture), I was able to make the bag neatly.


Here is the finished prototype bag with a flower cut from glitter card stock (multiple cuts at high pressure and 6 blade depth were required to cut this flower!)


For my Easter treat bags, I used card stock that was solid color to avoid the white core problem. I was able to cut two on a sheet and I used some of the flowers to decorate the bags. First I ran them through my paper crimper - I have had this tool for years but rarely used it (I think I will be using it more now!).

I used a colorful eyelet to secure the flowers to the bags. Here is a photo of the crimper - it is made by Fiskars and I think it is still available at craft stores (there are probably some other brands and styles out there as well).


I set up a cut file with all of the names and cut them from Wall Pops vinyl - it sticks to paper just like it sticks to walls! I used part of a 12 inch by 6 1/2 iinch strip for the names and the upright feature of the Opposites Attract font for the names which I welded and then stretched or shrank to fit comfortably on the bag fronts. Once again the 4 blade depth, medium speed and medium pressure worked like a charm to cut the vinyl cleanly without cutting the backing sheet. Here is the "leftover" vinyl - there is room to cut more from this sheet so it is in my "save" pile waiting for the next project!


Using the thin vinyl to label the bags gave the front a smoother look than it would have had if I had used paper and glued it - it was also a big time saver since the vinyl is adhesive backed.

Finally, a photo of the basket of filled treat bags with jelly beans, "grass" and fancy Spring chocolates.


No cut files since your young relatives most likely have different names (!) and I really just wanted to show how helpful the software can be when you want to cut using the designs that are on the cartridges without combining them in new ways.

Wednesday, March 26, 2008

Fabulous Finds Snowflakes


It seems like the wrong season but believe it or not we have snow predicted for Friday morning! These snowflakes are some more of the things I designed while exploring my Fabulous Finds cartridge for some different ways to use it.

Here are close up photos of each snowflake - the solid flowers


The open flowers


the solid hearts


and the open hearts


These are very simple - just eight repeats of some of the tab designs positioned at equal angles around the center (overlapping the center holes as closely as possible). Six pieces would make a more accurate snowflake but I liked the look with eight better - a bit of poetic license calling them snowflakes!

Each snowflake has an extra cut circle centered on top of all the small circle cuts to make the final result symmetrical as you can see in this photo of the new circle and the overcuts of the small circles.


These are easiest to design from the center of the 12 x 12 mat but remember you can cut a smaller piece of paper and place it in the proper position as shown below - it should be about 6 1/2 by 6 1/2 inches and placed in the center of the mat as you can see here (no need to waste an entire sheet of 12 x 12 paper).


I used 3 inch tabs for these so they are just a bit big for the baby bug but you can easily duplicate this pattern with slightly smaller elements on the baby bug mat.

It is fun to layer the various snowflakes together and see how the designs change - here are some examples.


In this final example I actually "wove"them together by pulling every other flower through to the top above the hearts.


I think I may try cutting these in different colors and then layering to see how that looks! What variations will you come up with - I'd love to see them via comments or a post to the Cricut Message Board.

Fabulous Finds Snowflakes

More words on the walls


This was a project for a library - the homeowners wanted something related to books but not too long or serious - we ended up with "So many books, so little time!" I used Alphalicious at 6 inches to design this - I like the whimsical nature of this font. I discovered that there is no comma on Alphalicious so I used the one from Plantin Schoolbook.

Here is the view as you enter the library from the most frequently used door.


The number of letters is nearly the same in each phrase but the first part has wider letters (the "m, n and o" are all much wider than the "l, i and t" so it is difficult to get the spacing to work and look balanced. We ended up choosing to keep the spacing from the sculpture in the center consistent which made the first phrase extend a greater distance to the left than the second one extends to the right. Since the room is usually entered from this door, the eye is fooled and it looks like the length is about the same due to the angle at which it is viewed.


Here is a close up of each side of the saying


The capital "S" in Alphalicious is rather short and looks a bit funny (like it might be upside down) so we tried it both ways (flipping the "s" top to bottom) but ended up keeping it as the font is designed.

Painter's tape is very helpful for keeping your lines straight - of course you do have to get the painter's tape on straight to begin with! I used 12 inch rulers propped on the top of the window trim to place the tape. Next time I will try a laser level - that also reduces the risk of a faulty spot in the wall paint lifting when the painter's tape is removed.


I used Design Studio for this project but it is not necessary to have it to do wall words. Using Design Studio just helps you to conserve the amount of material you use since you can lay out the letters to fit tightly together before cutting. I was able to get the entire saying to fit in five feet of 6 1/2 inch "wall pops" material. I also used my 24 inch mat for the first time and this helped to get the letters fit together tightly since I had more room on the mat to "play" with the positioning.

When adding letters randomly like this is is easiest if you write out your phrase and cross off the letters as you add them - this insures that you cut all the letters you need since they are out of order and it is hard to keep track otherwise! Below you can see the "leftovers" - there is some room here to cut out a few more small things so they are in my "save" pile for now!


If you didn't see my earlier post about cutting wall pops in the Expression (February 5, 2008) I will repeat the cutting information here. I have been very happy using blade depth 4, medium pressure and medium speed - the wall pops material is cut cleanly and the backing remains intact which makes it easy to remove from the mat and to transport to the place you will be posting the words. It is important to smooth down the material and get all the air bubbles out before cutting.

No cut file posted this time since everyone will have different ideas about what they want on their walls - I just wanted to show you another idea. (If you want to copy this exact phrase you can email me to send the file to you - contact info is in the right column at the top).

Have fun changing your walls to fit your mood!

Wednesday, March 19, 2008

Fabulous Finds Doily (or frame!)


So many frames lately - so I went back in my files and found this doily that I did a while ago but had not posted . (I actually haven't posted everything I've done - some are too simple, some are too personal and wouldn't be useful to others, and some are just waiting for a little something to make them "post-worthy").

I got the Fabulous Finds cartridge for a great sale price shortly after I got my Expression but I hadn't really used it - wasn't even sure what all those things could be used for! I looked at some of the interesting shapes and liked the hearts (I think I started this around Valentine's Day) so I started flipping and rotating them and this is what I came up with.

The offcut has an interesting shape - I think this could be used for a layout - it's in my "save" pile. I think it looks like some sort of flower...


I set this file up on two mats and the second mat has the cut to turn it into (surprise!) a frame!

Here is the doily on the mat after cutting


Here you can see it with the center circle removed and sitting beside it


Finally - here is the open doily or frame


It is a bit fiddly getting all the small pieces out but just be patient - if you have trouble with the cutting it may be time to replace your blade. I hope you like this one and can find a place to use it. Take a careful look at this cartridge, there are a lot of intriguing possibilities beyond the hinges, tags and fasteners.

Fabulous Finds Doily

Another larger frame- Simple ten inch square with circles


This is a larger version of the baby bug frame for those who have the Expression and can cut larger items. I used Plantin Schoolbook for the frame outlines since that is the cartridge that comes with the Expression and many people who did not start with a little bug can't find a George cartridge for a reasonable price!

Here is the frame it the "Plain Jane" version - straight off the mat!


This frame could be for a special photo, a title page or multiple photos using the small circles. You can fill the "holes" with other colors to create an interesting effect - here is a close up showing how they fit in the frame.


A one and 1/4 inch circle fits it the opening nicely - you can use a hole punch (remember those!) to get a detail or face from a photo to put in each spot - as many or few as you like in any sort of pattern you think of. Here is an example of a photo punched to fit.


You can also try using markers on this frame - the circles are narrow so become nearly black with just a thin line of paper color showing - the places where they are welded are a bit thicker so you can see more color there.


This frame was designed using the silhouette circle from Mini Monograms (a very useful cartridge to have). If you don't have it you could redo the file and use a circle from Plantin Schoolbook welded in the same pattern and then add slightly smaller circles that are not welded which will cut out the center of each welded circle - give it a try and contact me if you need help.

I also created a background filler on this file - similar to the one for the baby bug frames. Here are a few photos showing how this can change the look of your page.


This background filler will also fit the "Friends" frame from my post on March 6th.


Ten inch circle frame with background filler

Endless variations are possible here - see what you can come up with!