Monday, October 31, 2011

This and That for Halloween


Today is the day for trick-or-treating and our neighborhood "Halloween Parade" (it's actually a stroll around the block but lots of fun to see).  After a very busy weekend, I just have a couple of quick things to share with you today.

an idea...

This clever idea for Halloween "eyeball" treats is easy to do - just stab a munchkin donut hole with a fork and dip it in white frosting.  Then add some lines of red frosting and use a chocolate chip for an eyeball.  My sister-in-law did this last year and I thought that some of you may not have seen the post where I originally shared these gruesome treats!


a card...


I also shared this card last year - I made it with some Lettering Delights Halloween circles (you can read more about how to make the card here).  The same method can be used for any occasion using images that are appropriate to the day.


a sale...


If you like working with digital images, there is a dollar days sale on lots of holiday items at Lettering Delights - the sale ends tonight.  Fonts, alphabets, graphic sets and paper packs are $1 and cut-it sets are $2.  The cut-it sets can be used with machines and programs that will cut SVG files.  You can use the code "DollarHoliday" to save 20% on an order of $20 or more.

Holiday Dollar Days   (click to go to the sale pages)


and something interesting...

Finally, my brother recently shared a link to a very interesting post about making "Wicked Witch of the West" dolls.  There is a company called R. John Wright in Vermont that makes all sorts of collectible dolls and animals. 

If you've been reading my blog for a while, you know that I use step-by-step photos to share the methods for making various projects.  If you have a few minutes to spare, the step-by-step explanation of the creation of the Wicked Witch of the West doll is fascinating - and makes me want to take up doll making!  (click the red words above to go to the page with the production photos),

I hope our trick-or-treaters are not discouraged by the snow - I think most of it will be melted and they will just need to bundle up to stay warm.  If you are celebrating Halloween, I hope you have lots of fun - just don't eat too much candy!  

A great big Happy Birthday to Rebecca! (my niece who thought everyone dressed up and came to the house to see her when she was a very little girl - Halloween birthdays can be fun!)


Subscribe to Capadia Designs 

Share/Bookmark

Sunday, October 30, 2011

Snow for Halloween


If you are stopping by for the Creative Charms Fall Blog Hop, please click HERE to go to the blog hop post.  After you finish the hop come on back and have a look around!


The Northeast US is experiencing a terrific storm this weekend - the weather people are calling it "Snowtober" and there have been many power outages.  We have have a fair bit of snow already here in Massachusetts with more on the way. The storm is more extreme in the western part of the state.  My brother-in-law's parents have 18 inches and counting.  When I wrote about "Merry Halloween", a couple of days ago, I didn't really want Christmas weather to come so quickly!

We have five extra people at our house this weekend and I've been doing a lot of visiting and cooking.  My two nephews had a bread baking lesson and we made delicious some rolls to go with our "football stew" (another recipe for another day). 


I had promised to do a little crafting with the kids and the haunted house from the Happy Hauntings Cricut cartridge was the top choice for Thomas since Scott already made a 3D castle with me last summer.


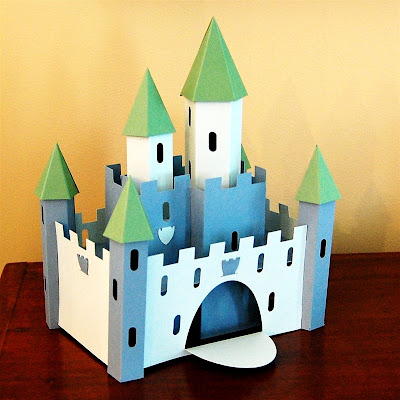
This is the castle that Scott and I made from the Once Upon a Princess cartridge.  When we made this I thought it was a little complicated...it is a piece of cake compared to the Haunted Mansion!

I didn't take photos while we worked on the Haunted House so this will be a quick post.  I do have a few tips to share that might help you if you attempt to make your own spooky mansion.

1.  If you want to have a light shining inside the house, be sure to cut all of the window filler pieces from thin paper or parchment.  We used regular yellow cardstock, never thinking about putting a light inside and it is too thick to allow the light from a battery operated candle shine through,

2.  Be prepared for the project to take several hours - I think it was about three hours and we haven't done any embellishing yet.  There are a lot of pieces to cut out and score and the assembly is rather complicated.  You definitely should score the pieces to get the folds sharp and even and to help the parts fit together as designed.

3.  If you want to have the roof and some of the other pieces in different colors you will need to use Design Studio, the Gypsy or the Craftroom to hide images and conserve paper.  Otherwise, you will need to cut some of the feature keys multiple times in different colors to get the multicolored effect.  We decided to just use the purple (I had a lot of it) to make this model.   Now that we have done one, it will be easier to figure out how to cut the pieces for another in various colors.

4.  If you press "fit to page" for the first cut, watch the screen to see the size to cut the rest of the pieces.  To cut this entire house on 12 x 12 cardstock with no manipulation in any software, the size will be set at seven inches.  The assembled height of this house cut at seven inches is about eleven inches.

5.  The mechanism for holding some of the pieces together is an "arrow and slit" style connection.  If you use a heavy cardstock, it will help a lot to take a tool and loosen up the slits a bit before you attempt to slide the arrow tabs into them.

6.  Pay attention to the images in the book to be sure that you adhere the window linings to the correct side of the house cuts.  If you stick it down on the wrong side you'd have some extra cutting to do (don't ask me how I know this...).

7.  If you want to stamp or add other surface decoration to the house pieces, do it while they are still flat!


8.  The trickiest part of all was the roof.  There are two sections and you actually need to put the sections together and then add them to the top of the building.  By reaching in from the bottom you can help to secure the roof to flaps where you have placed the adhesive.

9.  We used Scor-Tape and a glue pen for the assembly.  Scor-tape will hold very well and you can avoid the potential mess of liquid glue.

10.  It took six pieces of 12 x 12 cardstock to cut out all of the pieces needed to build the house - so make sure you have enough paper when you start to avoid disappointment.

When we finished (past bedtime) I thought I would not want to make another one of these for a very long time.  As I look at these photos of our Test Model assembly, I can see lots of ways to add more interest and I may be back to cutting out another one tomorrow!

Be safe if you are in the path of this storm - it might be a good day to stay home and craft (with your fingers crossed that the power stays on!).  Do you like to make 3D objects from paper or do you prefer to make flat cards or pages?  Good luck with the last minute preparations if you are getting kids ready to trick or treat,  Have a wonderful Sunday!


Subscribe to Capadia Designs 

Share/Bookmark

Saturday, October 29, 2011

Halloween Lantern with Vintage Images


 If you are stopping by for the Creative Charms Fall Blog Hop, please click HERE to go to the blog hop post.  After you finish the hop come on back and have a look around!

I found another way to use some of the vintage Halloween images from Twisted Papers.  I've had this idea in mind for a while and Friday night I finally had a chance to make a basic prototype version.  


I used this tag from Tags, Bags, Boxes and More on the "TagsMirror Windows" feature to form the lantern frame.  I sized the tag at 8 inches to be sure it would fit on an 8 1/2 x 11 piece of cardstock.  By using the Gypsy, I was able to tap "weld" and eliminate the tick marks for the scoring (you can do the same thing with Design Studio by checking the "welding" box).


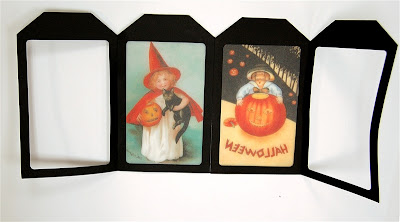
This is the large tag cut removed from the mat.  I cut four of these - two for the outside and two for the inside of the lantern.


I printed out two copies of a couple of vintage Halloween images on vellum.  I made them approximately the size of the openings in the tag frames.  When I printed the images I used the setting for transparency film in my printer and that seemed to work well (photo paper settings would probably put too much ink on the surface).


Once I had the frames cut and the vellum printed I was ready to start assembling the lantern.


I eliminated the tick marks because it is very easy to see where to make the score lines.  Just place the frame against the top of the scoring board and line up the "notch" between the two frames with any line on the board.


Fold toward the "mountain" of the score line - be careful, the frames are rather thin and you don't want to tear the paper.


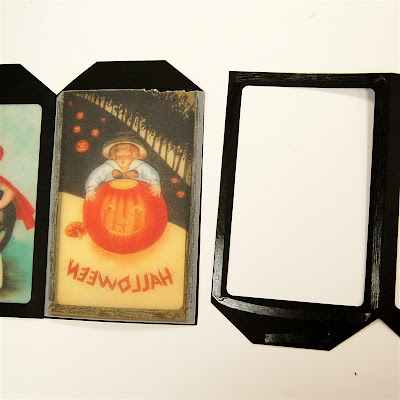
You can use one of the cut outs left from the frame to help determine where to trim the vellum image so it will fit properly.  I had "guesstimated" on the sizing and it worked out almost even - my images were a bit long for the frame.


Be careful when you trim the vellum with a trimmer - the blade seems tear the paper easily at the start of the cut.  It is sometimes better to put the blade down in the middle of the cut and pull it to both ends to get a smooth result.  It doesn't really matter here since this edge will be sealed in the frame.


I used an ATG to apply strong adhesive all around the frame.  Then I carefully lined up one of the vellum pieces, making sure to have the "good" side facing out.


You might have to trim a bit at the angles on the top of the frame.


When you have all four images secured in two of the frames you can start to put the lantern together.


Add more tape all around the inside of one of the empty frames.


Then, line it up with the inside of the vellum image and stick it down.  The tape is very aggressive, so take the time to line it up carefully the first time!


Add more tape to the other empty frame section and apply it over the second vellum image.


After this step your frames should look like this.


Add more adhesive on the open frame and place the second section with the vellum images on top of the frame.  The lantern will look like this from the outside.  Now you just need to add adhesive to the last open frame and carefully pull it closed, adhering to the inside of the last vellum pane.  This step is the most difficult because it is now a three dimensional object.


When all four sides have been connected, the lantern will be finished (with no exposed edges of the vellum showing) on the inside.


I used four battery powered tea lights to illuminate the lantern.


It is very difficult to take a photo of the lantern in the dark but here you can see the effect of the low tea lights.


Next, I tried a real candle (in a glass container).  The effect is slightly different when the flame is higher.


This lantern looks pretty when it is lit up and also when it is in unlit in the daylight because of the colorful images.  I made this one as a start - I have lots of ideas on ways to "fancy" it up!  You can use different frames, change the sizes, use different images on each side, add lots of embellishments - there's no limit to the variations that are possible. I want to do some of these as hanging lanterns - won't that be pretty?!

We have company for the weekend - my husband's sister and her family are staying with us while the new floors in their house addition are being installed and finished.  There may be some haunted house building happening on Saturday...I hope you have a crafty weekend!


Subscribe to Capadia Designs 

Share/Bookmark

Friday, October 28, 2011

Merry Halloween! A Fall Blog Hop with Creative Charms


Happy Friday and welcome to the Creative Charms Fall Blog Hop!  The hop officially begins at 9 a.m. so if you are reading this on the early morning email feed, please stop back a little later this morning to follow the hop.  The hop begins on the Creative Charms Blog and there are just ten stops so it won't take too long to get around and see all of the projects.


The grand prize giveaway is November's Kit of the Month and Deal of the Month from Creative Charms. Plus, throughout the weekend, Midori will go to one or another of the blogs on the hop, randomly pick a comment and that person will win a prize. She has tons of prize kits made up just for this weekend. So be sure to leave a post on every blog you visit. All prizes will be announced on Tuesday, November 1st. To win the grand prize, leave a comment on Midori's blog to be entered.

Here is the complete list of blogs in the hop - in case you get lost along the way.
 So, enough about the logistics, let's get on to my project for today!


Did you know that people used to say "Merry Halloween?"  It sounds funny to modern ears, but there are vintage images that use this greeting.  I love vintage images and it's been a while since I have used any for a project.  One of my "go-to" sources for great vintage images is Twisted Papers.  They have all sorts of wonderful things (over 7,000 images) and I could spend hours just looking through the categories.  While I was looking at Halloween images, I noticed several "Merry Halloween" cards.

With Halloween just around the corner, I thought I'd make a few simple cards and enhance them with some Creative Charms vintage items.  Using vintage images is fast and easy.  I just selected some images that I liked and downloaded them.  The images are jpegs so after downloading you can edit them in your favorite photo editing program and also make any adjustments to size that you need for your project.  Most individual images at Twisted Papers are 99 cents but they have a terrific deal on a monthly subscription which allows you to download up to 500 images in a month for only $24.95 - about a nickel an image!  The subscription does not renew automatically. 


I printed out three images on letter size matte photo paper.  I sized them at 5 1/4 inches tall and kept the aspect ratio locked so they would stay in the proper proportion.  The images were a little narrow for a standard A2 card.  To make things fit neatly I either added a strip of paper, matted the image or added trim along the side of the image.  For the first two cards, I wanted to add some velvet ric rac ribbon so I placed a piece of Scor-Tape in the center of the the contrasting strip of paper and then placed the ribbon on the adhesive.


On this card, I used a brown card base and black velvet ribbon on the orange pearl shimmer cardstock strip.  I aligned the ribbon and then trimmed it at the ends.  The Scor-Tape is a strong adhesive and holds the ribbon neatly with none of the marks that you might get with a liquid adhesive.


On the second card, I layered the printed image on a piece of 5 1/4 x 4 inch piece pf the same orange pearl cardstock.  This time I added brown velvet ric rac ribbon to the strip and used a black card base.


There is something about the zig zags in ric rac that seems "Halloweeny" and the velvet adds some fun texture to the cards. 


The finishing touch for each of these cards was the addition of three small gem stickers along the ric rac ribbon.


For the third card, I used a brown card base and aligned the image with the right side of the card front.   Then I added some vintage trim that I found at a rummage sale.  I think it is actually the edging strip that is used for upholstery.  I thought the curves in the trim worked well with the curves in the font used on the card.


The finishing touch is a vintage velvet poppy, another all-time favorite Creative Charms item.  I replaced the pearl brad in the center with a vintage marble brad in amber.


In no time at all I had three cards finished - they may even get delivered in time for Halloween!

If you are interested in vintage images, be sure to check out Twisted Papers - they have over 1,000 Christmas images and can be used with your Creative Charms items for easy and elegant cards.

My Giveaway -
Thanks for visiting - I have a small prize that I will give to one person who leaves a comment on this post.   I'll send some velvet ric rac, velvet poppies and a few other goodies to use for a vintage card.  All you have to do is tell me which card of the three is your favorite - easy peasy!

The next stop on the hop is Arlene's blog.

Have fun hopping!  Remember, to qualify for the prizes throughout the weekend you need to leave comments on each designer's blog hop posting.  Prizes will be announced on Tuesday, November 1st.

Oh, by the way....


...it did snow here last night!


Subscribe to Capadia Designs 

Share/Bookmark

Thursday, October 27, 2011

Gingersnaps


A couple of days ago I showed you the card I was sending to my Dad with some Halloween treats.  He has the package now, so I can show you what was inside...

Gingersnaps!

These gingersnaps are one of our family favorites.  My mother used to say that if she had a nickel for every gingersnap she had rolled she'd be a wealthy woman!  Some of my early memories of helping in the kitchen involve rolling the balls of gingersnap dough in sugar before they were baked.


We have made this recipe countless times and have worked out ways to be super efficient in rolling and baking.  The dough should be mixed and then chilled for a few hours or even overnight before rolling the balls for the cookies.  It helps to have at least two people when you are ready to bake the cookies - one to roll the balls of dough and the other to roll them in the sugar and place them on the trays.


An important extra step in the baking is to hit the trays on the oven door when you are switching the position of the trays halfway through the baking time (top to bottom and front to back).  This helps to create the cracks in the cookies.  The degree of cracking seems to depend on other factors as well - humidity, length of chilling time and the choice of margarine, butter or other shortening for the dough.


This particular batch did not get very dramatic cracks.  They always taste delicious - no matter what they look like!

With Halloween just a few days away I think it is interesting to see how trick-or-treating has changed.  Today you have to be very careful about what you hand out and so many of the trick-or-treaters seem to have allergies or restrictions on what they can eat - parental approval is definitely required.  My mother used to give out these homemade gingersnaps in little bags.  Parents would tell their kids not to eat any candy until they came home so it could be checked.  Several neighbors confessed to Mom that they used to "confiscate" the cookies to have them for their own special treat! 


I have been working on making up family recipe cards - I started this project several years ago and from time to time I get organized enough to do another recipe.  I still have many to do.  I do the recipe cards digitally and eventually I might put them together into a family cookbook.


I started with this idea of making up cards with photos of the result of the recipe when I first began using the Creative Memories StoryBook program.  The program has gone through several versions and the 4.0 upgrade was recently released.  The latest version offers a free 30 day trial that can be downloaded from my CM personal website HERE.


I have done several versions of the recipe cards.  The 8 x 8 page above was done for a recipe swap a few years ago.  If you look carefully you can see that the "photo corners" are actually little clusters of cookies.  I used the StoryBook software to create digital cookie embellishments.   I designed the frame using Cricut Design Studio in one of the earlier versions and used the Cricut markers to outline the frame.  The design was inspired by some of the serving plates that my mother had - clear glass with round beaded edges called candlewick glass.

I think you can read the recipe from the photos if you'd like to give it a try (just click on the image to make it larger).  This recipe makes a double batch.  It is pointless to make a single batch - if you are going to go to the work of rolling and baking you might as well get seven to eight dozen cookies!

Thanks to all of you who made suggestions about my troublesome card in yesterday's post.  I had considered embossing the background - it actually is a textured shimmer cardstock and looks better in real life than it appears in the photos.  My cold seems to have turned into a sinus infection and I was feeling rather "uncrafty" and grouchy - thanks for being patient with me!  I will give it a second look and may do a "new and improved" version.

Do you have some traditional family recipes?  How do you keep the cooking traditions going and pass them along to the younger generations?  Have you ever made a recipe scrapbook?

Subscribe to Capadia Designs 

Share/Bookmark