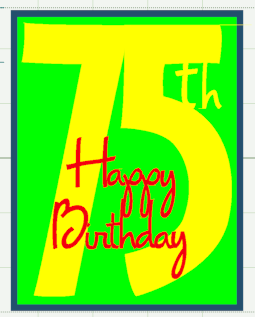
We had a family get together today for my father-in-law's Birthday (he will be 75 in a few days). Of course, this called for a card! I wanted to try out the foil cardstock from my DCWV Citrus paper stack so I set about designing a card to feature the shiny mirror finish paper. I decided to use the blue (the stack comes with blue and red foil papers).

I wanted the card to have a more "masculine" look so I chose the "Opposites Attract" cartridge. This cartridge has both a bold blocky font and two variations of a cursive font. I used the "Opposite" font for the "75" and the "Upright" cursive font for the "th" I welded to the number and the "Happy Birthday" which I welded as a separate unit to place on top of the "75." If you position all of the letters in the manner you want them to weld, but leave weld unchecked, you can try previewing different colors for each page to see the effect of various colors for contrast.

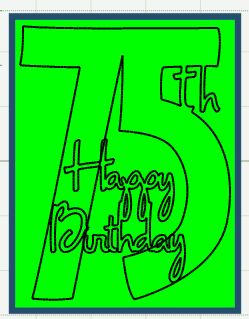
Once you have chosen your colors, be sure to go back and check "weld" so your letters and numbers will cut as one unit. You can double check this by previewing - if the shapes show up as a dark black line with no color inside they are welded.
The green and blue in the above screen shot are sizing rectangles - the blue represents an A2 card front (4.25 inches wide and 5.5 inches high) and the green is 4 inches wide and 5.25 inches high to represent a layer option with a one eighth inch border. When I did my test cuts, I actually cut the smaller rectangle so I would have a useful negative cut I could layer on the card top if I liked the look.

Here are two versions of the card. I used the blue foil and the bright green and orange cardstock from the Citrus cardstock stack and some glitter stripe cardstock from the Citrus stack to try various options for the card. The foil cardstock is very attractive - the shine is dramatic (and difficult to photograph!).

For this card, I inked the edges of the card, orange layer and "75th" with blue ink. The foil "Happy Birthday" looks great with the glitter cardstock.

This is the version of the card we decided to give - the shiny "75th" is the focal point with the "Happy Birthday" in orange layered on top.

Here is a close view of the "Happy Birthday" - I added white dots to give it a bit more "spark."

Yet another variation could be made using the offcut from the "75th" cut - you'd need to be sure to save the small piece between the "5" and the "t" and to adhere it in the correct position.
It is a lot of fun to experiment with various combinations of papers in the same design and to see the difference it can make for your cards.

No comments:
Post a Comment
Thanks for taking the time to leave a comment. I love to hear from the people who read my blog. I moderate all comments to keep spam off the blog without making you decode the squiggly letters so your comment may not appear immediately.