Sunday, August 5, 2012

Inset Card Designs with the Cricut


Creating inset designs for card fronts with the Cricut is simply a matter of using the "hide contour" option to eliminate the outer line of the design and turn it into a stencil cut.  You can also use this technique to make masks with wider edges for spray inks and mists.


I've made lots of these cards from Cricut images over the years.  I've added photos of some of the posts that have more detailed explanations.  You can also choose the label for "hide contour" or T - DS - Hide Selected Contour to find more posts.  Some of the posts may be about other uses of the hide contour option - but those are fun to know about too!

Just click on any of these photos to go to the post with the detailed explanations.


done on the Gypsy

negative pieces saved to make a second card

We'll be back from our reunion events later today and I'll try to catch up with any comments or questions then.  I hope you are having a nice Sunday!


Subscribe to Capadia Designs if you would like to have new posts delivered directly to your email. Share/Bookmark

Saturday, August 4, 2012

Inset Card Designs with the Cameo


Several people have asked for more information about creating cards with images cut into the card front.  I shared the card at the top of this post a while ago - you can see the original post with directions on how to make it HERE.   The design was a stencil image form a Dover Publications book - they have so many great books and free sample images every week (you can sign up for the weekly email on their site HERE).

This card was easy to make because the image was already a stencil image.  When you want to inset a design from a regular image, you have some different steps to follow.  I have a quick tutorial for you today using the Cameo and the Silhouette Studio software.  Tomorrow I'll post a reminder about how to do this type of card with the Cricut machines and software.


For this example, I chose a shape from the set of images that are included when you buy your machine.  You need a design that has some internal details to make the card more interesting.  (Of course, you can just cut a plain heart or other shape into a card front but when there are multiple pieces that make up the design the effect is more impressive!).


If you were to cut out the shape as it appears in the library and place it on top of a circle shaped card it would look like this.  I filled the card shape with red and the heart image with white for this screen shot. 


I changed the fill color to blue to make this easier to see.  You should right click and choose "release compound path" from the drop down menu.  This will make all of the shapes fill with the blue color.  If the design was grouped when it was created, you will need to right click again and choose "ungroup."  You can first try to pull away the outer scalloped circle (or the outer shape of whatever image you choose) to test whether you need to ungroup.


I removed the color from the card to make this easier to see.  Select just the outer scalloped circle and pull it away from the card and the inner shapes.  You won't need this again unless you decided to cut it in a contrasting color and use it on the inside of the card.  For now, drag it off the mat and out of your way.


Now you need to drag a box around the individual pieces of the heart image, right click and choose "group" to put them together again.  Once you have done this, you can work with the group as a whole unit and pull on one of the corner squares to increase the size to fit nicely in the card.


Then, drag a box around the card and the heart image, right click and choose "make compound path."


Finally, select the shape and fill it with a color to see how the finished cut will look.

Give it a try and see what you can come up with - if you have any questions, please leave them in a comment.  I'll respond as soon as I can.

I hope you are having a great weekend!


Subscribe to Capadia Designs if you would like to have new posts delivered directly to your email. Share/Bookmark

Friday, August 3, 2012

Family Reunion Baking


Happy Friday!  We'll be meeting up with some of our extended family members this weekend and I have been doing some baking.  One on the things that I made was rhubarb crisp.  The photo at the top of this post is the rhubarb mixed with sugar, lemon zest, Cointreau (orange liqueur) and cornstarch.  The colors are so pretty and I liked the texture as I mixed it up so I pulled out the camera to take a few photos.  These will be great for digital backgrounds (I am still working on that recipe project!).

I like to take photos of recipes in progress and I am always thinking about images that will work as a page background.  It only takes a few seconds to snap a couple of photos and then you will have lots of creative possibilities. 


I also made some of our favorite black bottom cupcakes - chocolate cake with a cream cheese and chocolate chip mixture dropped in the center and baked.  I have posted this recipe a couple of years ago HERE and I even did some recipe cards that you can see HERE.  The Rhubarb Crisp recipe is from the Silver Palate Good Times cookbook, one of my favorite cookbooks.

Provo Craft is continuing to give free access to a set of Cricut Craftroom Exclusive shapes each week.  This week it is the October and November Classroom images.  When you log in to your Cricut Craftroom account, select "my cartridges" on the drop down menu and you will see that the digital cartridge is listed.


This is one of the larger sets of images available as a Craft Room Exclusive so you'll be busy cutting out as many things as you can for Fall!  If you were a Cricut Circle member until the end of July, you will notice that you have access to ALL of the Cricut Craft Room Exclusives.  This will last through the month of August so you should check them out and decide if you need some of the cuts.  If you have a Gypsy, the rights to the cartridges will be added to it when you sync the Gypsy (and I imagine they will stay until you sync the Gypsy again...).  I used one of the sets today to finish off my big project.


I hope you have something fun planned for the weekend!  We have our fingers crossed that there won't be rain for the picnic...

Subscribe to Capadia Designs if you would like to have new posts delivered directly to your email. Share/Bookmark

Thursday, August 2, 2012

Farm Stand Signs


One of my favorite things about summer is the wonderful variety of fresh fruits and vegetables.  We are lucky to have several small farms with farmstands where you can get produce right from the fields.  Of course, I also take notice of the signs!  Who wouldn't want to buy corn at a place that was identified by a giant smiling ear of corn!


I don't know if this type of stand is typical all around the US, but here on the East Coast I see lots of these buildings.  Usually they are a barn or garage type building and open only seasonally but in some cases they can grow into year round stores.


The sandwich signs at one of the local stands really caught my eye.  They are a little formal and unusual for a farm stand where the signs are often hand lettered and less permanent looking.  I think the shape would be great for a card.  I'll be trying one to make one soon, anyone want to join me?


In addition to the shapes, I like the starburst effect behind the main image.  I am thinking about the best way to mimic this...and I have a few ideas.


I just finished up a huge project I have been working on for a while and I'll have a few things to show in connection with that sometime next week.  This weekend we'll be going to a family reunion and I am going to watch for more farm stands with interesting signs...

Subscribe to Capadia Designs if you would like to have new posts delivered directly to your email. Share/Bookmark

Wednesday, August 1, 2012

Using the "Leftover" Cuts


I have entirely too many "leftovers" in my craftroom.  I hate to waste paper and I always hang on to the offcuts when I cut out a shape.  I used to be very good about making use of them right away (click HERE, HERE and HERE to see some examples from a couple of years ago).


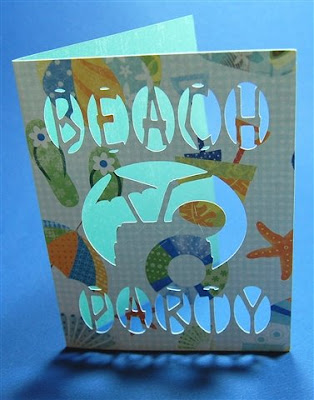
About a month ago I made this card (original post HERE) and I have had the scrap sitting around ever since.  I knew I could make another card with it so it was added to the pile of useful bits on my table.


The cut was not centered within the cardstock so I needed to trim it to make it fit a new card symmetrically. The clear ruler shows me that I'll need to cut more from the right side than the left side. 


I use clear layout rulers almost every time I make something.  I prefer to have things lined up evenly and these tools are essential to saving me time and preventing mistakes (remember, "measure twice, cut once!").  The ruler with the red grid is available at most art supply stores.  It can be a little confusing because there are so many numbers and lines so I picked up the clear ruler with less numbers but some additional useful holes for placing items evenly at a craft store.


I measured the cut placing the "0" at the center point.  Since I know I want the layer for an A2 card to be 5 1/4 inches wide, I need to trim the edge at 2 5/8 inches.  The grid on my trimmer helps to align the cut.
The top and bottom need to be cut at 2 inches from the center in order to create a layer that is 4 inches high.


I can use my ruler to double check the cuts and be sure that I center the design when I adhere it to the card base.


I changed to a pearly pink card base for the final card.  I thought it was softer and more feminine and this is definitely a girly card!


I punched and embossed lots of leaves to add to the center of the card.  These are done with the Nellie Snellen punches that I wrote about yesterday. I checked with Mandy and you can order from her in Australia.  The shipping will be calculated when you put the items in the cart so you can decide if the shipping cost is acceptable (they are heavy).  She did also point out that the GST (tax) does not apply to shipments that are sent out of the country so the prices would be 10% lower than what you see listed.


I used my Creative Memories Precision Point Adhesive pen to add glue to all of the tiny places that need to be stuck down firmly.


The purple backing for the cut is sized at 5 x 3 3/4 inches and I added it to the top layer face down on the adhesive and centered.


Here is the trimmed top layer with the purple backing added.  The yellow is Core'dinations Gemstone cardstock and the purple is from the DCWV Latte stack.


I figured out where I wanted the leaves before adding any adhesive.  Then I put some Scor-Tape in the center of the card.


I stuck the leaves into the Scor-Tape and added some tape to the backs of the leaves that were a bit further out to adhere them to the card front.


Once I had everything stuck down I added a punched green circle as a base for the flower.


The green circle covers the ends of the leaves neatly and helps to keep them stuck down.


A punched circle of dark purple serves as a base for the flower and intensifies the purple color.


Graduated sizes of pink pearls fill in some of the small "berry" spots in the design.


With the flower added (raised with a foam circle) the card topper is complete.


The last step was to simply adhere the topper to the pearly pink card base.


Now I just need to work my way through the stacks and stacks of leftovers and make some good use of them!  It does seem to be a never ending process...

Special Notice...

There is a new Cricut Cartridge available only from Close To My Heart consultants as of Wednesday, August 1, 2012.  The cartridge is called "Artiste" and it is a very full cartridge that I can't wait to try out.  My friend Melanie Brown of Courtney Lane Designs and Everyday Cricut is a CTMH consultant and she would love to help you if you are interested in ordering this cartridge.  You can get all of the details on Melanie's blog HERE and shop on her website HERE.  Melanie also has a new Facebook page for Courtney Lane Designs HERE.


If you purchase the "Artiste" bundle from Melanie during the month of August you will be entered in a contest to win a brand new Cricut Expression 2 with purple end caps.  Good Luck!


Subscribe to Capadia Designs if you would like to have new posts delivered directly to your email. Share/Bookmark