
Just in case you haven't heard the news from Cricut yet, the long-awaited Print Then Cut feature for the Cricut Design Space and Cricut Explore machine is coming very soon. It will be released in the week of September 22nd (next week!) so the wait is almost over. The update is free. You will need to update the plugin for the Design Space, update your machine firmware and calibrate your machine for printing and then cutting images.
I was asked to preview this new update so I have already had a chance to use the Print Then Cut feature and other improvements to the Design Space program. If you are an Explore owner, I hope you don't have a lot of plans for next week because you will want to be trying out all of the new things this update allows you to do. If you don't own an Explore yet - this update is likely to tip you over the edge (or at least give you the "big item" for your Christmas list - if you can wait that long).
For those of you who have not used other Print Then Cut systems, here is a quick explanation of the process:

First choose some images you would like to print and then cut. You can do this with any image but you will probably find it most useful for images with lots of layers - particularly if you want to use them at a small size. Add the images to the mat.
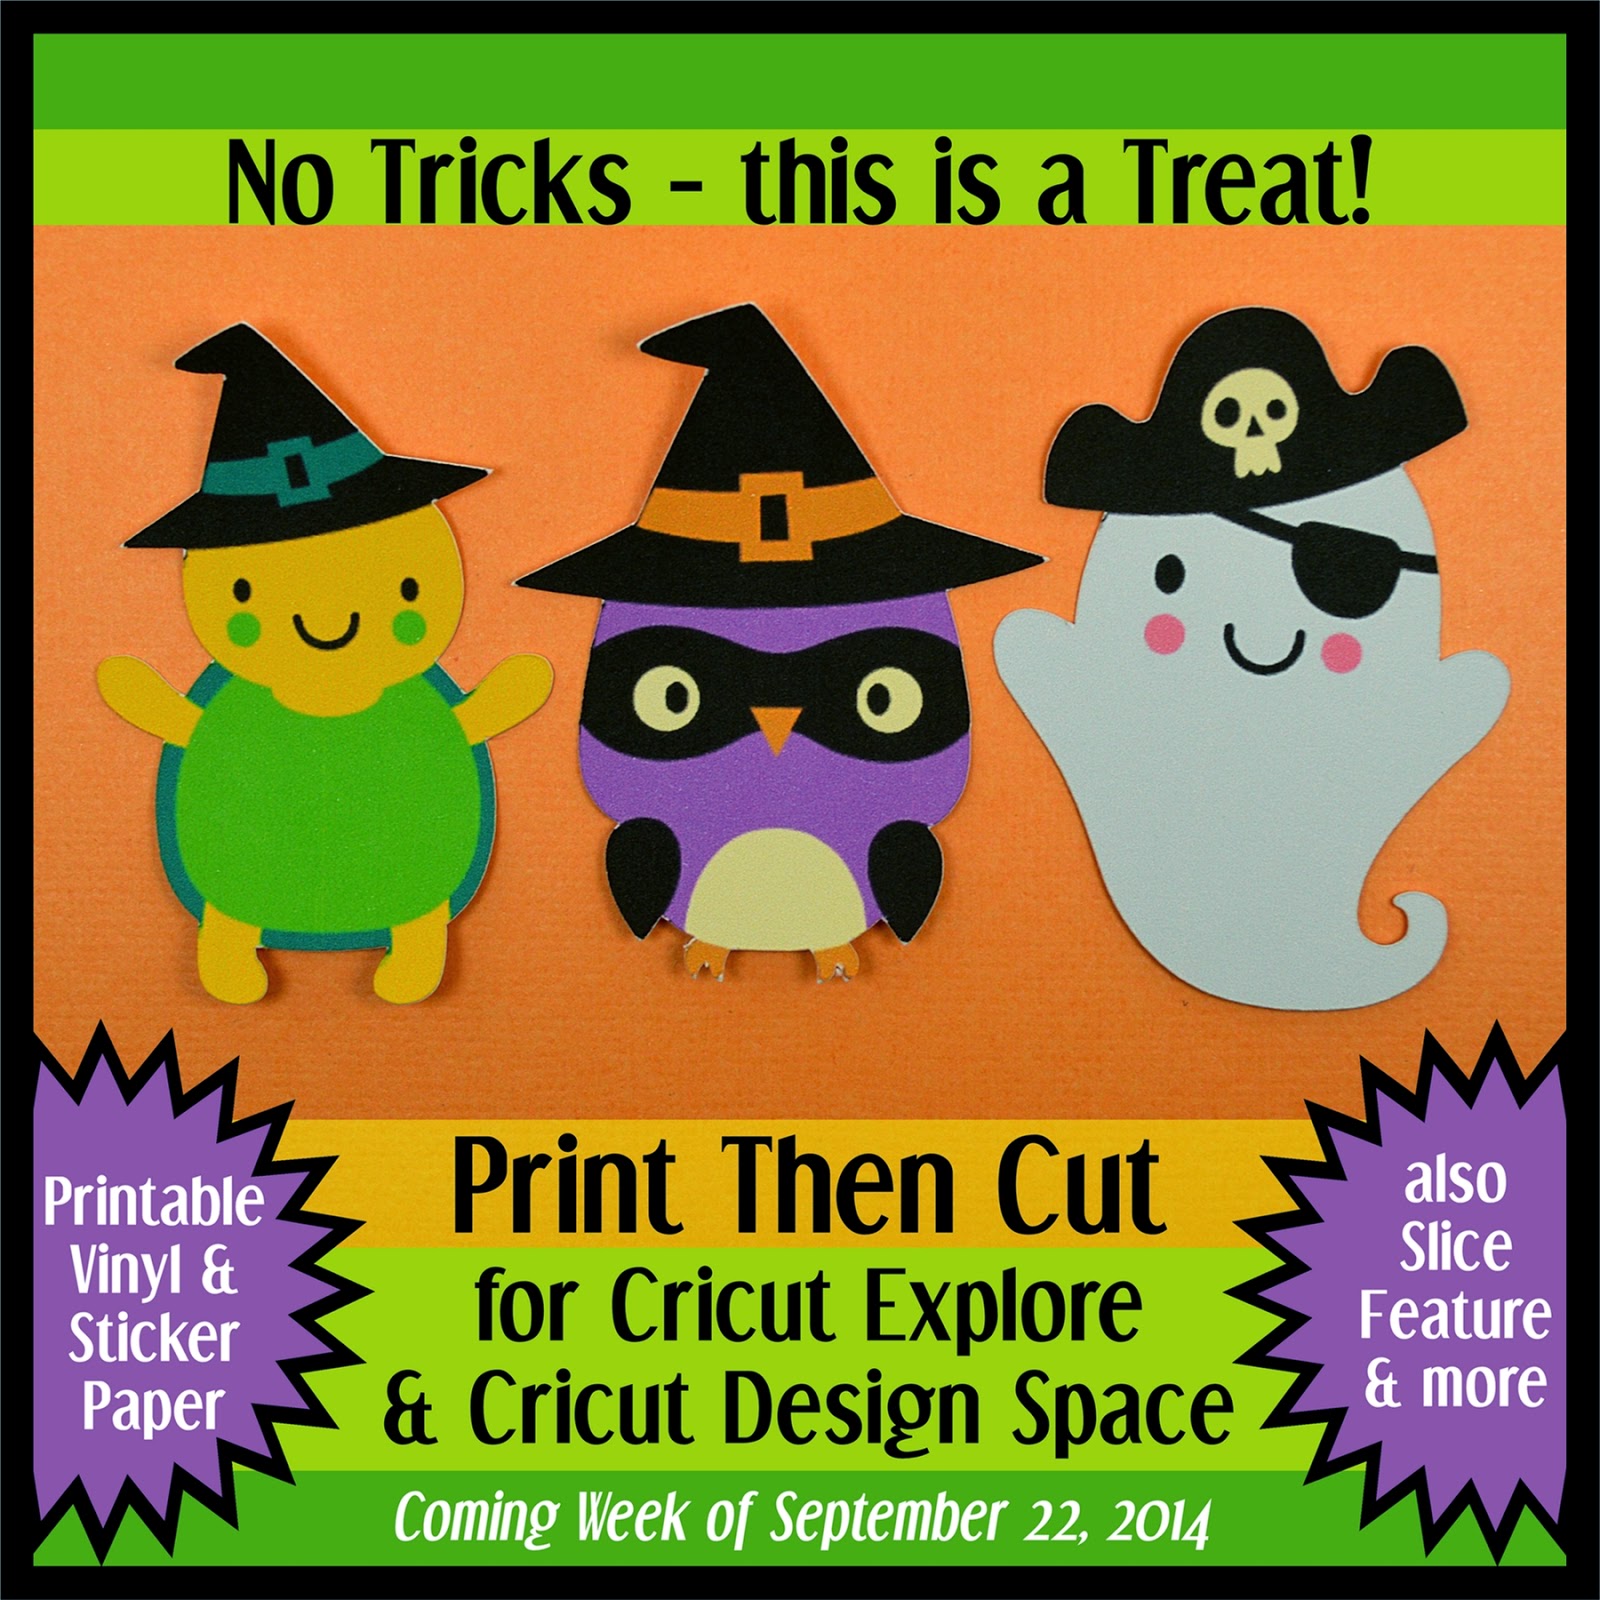
I chose some cute Halloween images from the Create A Critter 2 cartridge. They have multiple layers and the size is just 2.3 inches. These would be very fiddly to assemble if all of the layers were cut.

Next, select an image and then click the "Flatten" icon at the top of the layers panel. The layers will combine into one multicolored image layer. The Witch Turtle in the example above has already been flattened. The black lines that define the edges of each shape in the layered image will disappear.

If you don't want to use the default image colors you can change the color of any layer by clicking on the layer and choosing a new color (just as you do now for choosing papers).

You can "unflatten" an image if you change your mind about a color or decide to cut it in layers after all. The icon for "unflatten" will appear only when the flattened image is selected. When you unflatten an image the layers will return but you won't see the defining black lines around each shape. However, you will see all of the layers in the layers panel.

When you have selected and flattened all of the images you want to print then cut, click the "GO" button at the top of the screen as you do for any other project. The Mat Preview Screen will appear. The images will preview on the mat with three black corners or registration marks positioned around the group of images. These marks cannot be adjusted. (The printing is set for 8.5 x 11 paper - I am not sure when or if a 12 x 12 option or other sizes will be added).

When you click on the green "Print and Continue" box, the print dialog box for your default printer will appear. You can adjust the settings as you would for any printing job from your computer.

Go ahead and print the page on your printer. You can do this by either a wireless or wired connection. Take the printed page and load it on your mat as shown in the preview screen. Then follow the usual steps of loading, setting the dial and press "Go" to cut the images.

In just a few minutes from the time you select your images, you will have full color printed and cut images to use for your projects. This will make it so much easier to put together a card in a hurry - no need to assemble all of those teeny tiny pieces!

I have been very impressed with the accuracy of the cuts I have been getting. I have one tip to share that applies to all print and cut systems. Since you are using white cardstock to print and cut the images you may notice the white edge that is actually the side of the cut piece. You can ink this if it bothers you or just leave it alone - it only shows if you look at a piece from the side.

If you don't have a Cricut Explore yet, check out all of the bundles available on the Cricut site HERE. You may also want to pick up some of the Disney and other cartridges that include heavily layered images - suddenly all of those images can be used for fast and easy projects - and the eyes will look right!
Please leave comments on this post with your questions about the new Print Then Cut features (I'll talk about"Slice," the new printable cardstock and vinyl, and the Imagine cartridges in separate posts) and I will reply with answers. It is better to leave a comment instead of emailing me individually so that everyone can learn from your questions.
I'll be sharing lots more photos and projects as quickly as I can. We have been away and I just got home last night from a trip to see our old friends in England and Scotland - so I am a little jet lagged!
Subscribe to Capadia Designs if you would like to have new posts delivered directly to your email.
This post may contain affiliate links. If you purchase a product using the link I may receive a commission. I only participate in affiliate programs for products that I use or can recommend without reservation.
The question I have Diane is that I have the Imagine and almost all the carts to go with it. I did get the email from Cricut but it looks like you still have to have the Explore in order to use this. So what good is it to have the access to the Imagine carts unless you can use the Design Space with it and the Imagine. I am so confused.
ReplyDeleteHi Mary, I'll be writing more about the Imagine cartridges in my next post. With the new release you will be able to use the Imagine Art Cartridges with the Design Space and Cricut Explore. Unfortunately, the Imagine machine itself does not work with Design Space - they are totally different systems. So the digital access to all of the cartridges will be available to you if you eventually get an Explore machine.
DeleteThis sounds like a great addition. I am concerned, however, about being able to properly align the design on the Explore. It seems to cut in a bit from the placement lines on the mat. How can you be certain that it will cut exactly on the design?
ReplyDeleteThis is a great question. The regular cutting of shapes with the Explore places an image near the top left of the mat for cutting. When you are using the Print Then Cut feature, the cutting line is determined by the relationship of the image to the three registration marks. These marks are read by an optical eye. Then the exact location of the image is calculated by the software and the machine cuts it out very precisely. I have cut lots of items and they have been amazingly accurate, Keep an eye out for more posts showing the cuts you can get with this feature.
DeleteTime usually passes too quickly, but now I can't wait for next week to get here. Thanks for this great introduction. I always look forward to your concise instructions.
ReplyDeleteHi Ann, Thanks for the nice compliment. It is hard to wait but the release will be very soon and then you will be able to try out all that you can do with this update. There are a number of bloggers who were invited to preview the changes so you'll find lots of different people posting this week.
DeleteHi Diane, I've been reading all about the new Explore, and watched some videos about all these exciting changes, but haven't made the big jump yet. I still have my Expression and MTC and my Cameo, so I'll have to wait to purchase the Explore once my Expression dies. In the mean time - I'll just wait and see what else turn up with Provo Craft and Cricut.
ReplyDeleteHi Carmen! Lots of us have accumulated a collection of machines. I thought when I got the Cameo that there would be no turning back but the Explore is a great machine and I really love being able to use my cartridges so easily. The first thing that I was happy about was the perfect circles and scallops. Now the print then cut and the ability to use the Imagine cartridges as well as taking other images and turning them into printables is fantastic! Keep watching, I think there will be even more improvements to come.
DeleteThis looks really great and I might would be willing to jump if only the program wasn't online. My connection isn't that great so I wouldn't be able to even use it much of the time most likely. Love hearing about it though and if I run into the extra money I might try it. Thanks !!
ReplyDeleteAnna N.
Hi Anna, I had mixed feelings about the online only software and it definitely is an issue for people with limited internet access. There have been a few times when they do maintenance (usually late at night) and you can't use the machine but I haven't found it to take very long and there is always something else I can work on in the meanwhile. It is a great machine so it might be worth investigating whether you can get a better connection.
Delete