

After months, weeks and days of anticipation, the "big" update for the Design Space program went live overnight. I think there will be lots of busy people trying everything out for the next few days! Please leave a comment below if you have questions about how to use the new features.

If you want to find the items that are ready to print use the new filter for "Printables" under Type in the left pop out menu. (These are primarily from the original Imagine cartridges but I did see some new content too).
The images that are ready to print also have a small printer icon so you can recognize them if you do a search for a particular item like "Santa."

Remember, you can also use images from the regular cartridges and "Flatten" them so they will print as a single image. Directions on how to do this are in the blog post from last week HERE.

Before you print and cut your first image, you will need to calibrate your machine. You should be prompted to do this before you make your first cut. You can also calibrate at any time by clicking on "Calibrate" in the drop down menu under your log-in name (see above).

The calibration process is easy and quick. Just follow the onscreen prompts. I took screen shots to show you the steps. This first screen describes the process.


When you click "Continue," your regular printer dialog box will come up - just print as you usually do for any other document. It doesn't matter if you are using a wired or wireless connection to your printer - both are fine.

Next, you will take the printed test paper, put it on the mat at the top left corner and load the mat.

The machine will check for the registration marks and read them. Then it will cut the small rectangle in the center of the page.

After the machine has cut the rectangle, you need to check to see if the cut line stayed within the black area.

If the line is totally within the black box you can check "yes" on the report page and continue.

If the cut lines go outside the black area, check "no" and print another test page. I never had the lines cut outside the black area but they were very off center within the black box one time so I reprinted and tried again to get the best results.

Don't take the mat out of the machine.
Next the machine will make a cut at regular intervals along the side and top of the paper. When it is done, you need to read these marks.
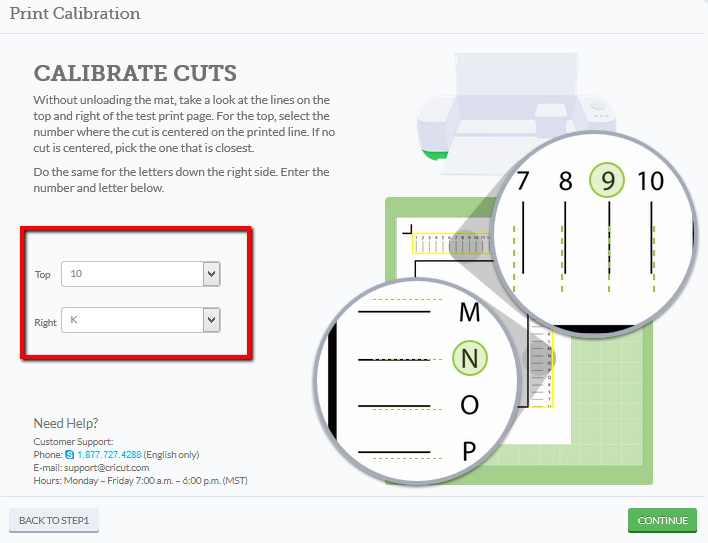
Look carefully and decide which letter and number correspond to the best, most centered cuts. It won't necessarily be the same as shown in the example on the screen as you can see from my results.

Finally, the machine will cut out the large rectangle. You need to check yes or no to indicate whether the cuts stayed totally within the black lines of the rectangle. If it did, you are all set.

The last thing you do is to "Save" and close the calibration page. You are now ready to print and cut!

There are four very helpful videos from Cricut on the Official Cricut You Tube Channel HERE.
Calibrating the machine
Print Then Cut Basics
Print Then Cut - Advanced
Cricut Design Space - Slice
I'd recommend that you start by watching these videos. Then just give it a try - your first Print Then Cut project is minutes away!
If you don't have an Explore machine yet - here is a very special offer for these two bundles...
(sponsored post)

Save an additional $10 on Cricut Explore® Machine + Basic Starter Set (click HERE) and Cricut Explore® Machine + Premium Bluetooth Set (click HERE) with the code SEPTSPECIAL.
Don't forget about Free shipping on all orders $35+ with code FREESHIP35! Simply enter the free shipping code at checkout for free standard shipping in the continental United States.

This $10 savings code is good until the end of September.
I will be posting some more Explore projects over the next couple of days. I haven't forgotten about the Scotland photos I promised and there are a few other things I want to post once all of the excitement over the Design Space update calms down!
Subscribe to Capadia Designs if you would like to have new posts delivered directly to your email.
This post may contain affiliate links. If you purchase a product using the link I may receive a commission. I only participate in affiliate programs for products that I use or can recommend without reservation.
No comments:
Post a Comment
Thanks for taking the time to leave a comment. I love to hear from the people who read my blog. I moderate all comments to keep spam off the blog without making you decode the squiggly letters so your comment may not appear immediately.