
Disney characters and other complex layered cuts are easier to do when you use Design Studio. You can set up the entire mat with pieces of the appropriate color paper for each layer cut. This saves time in the cutting and puts everything at your fingertips for assembly.

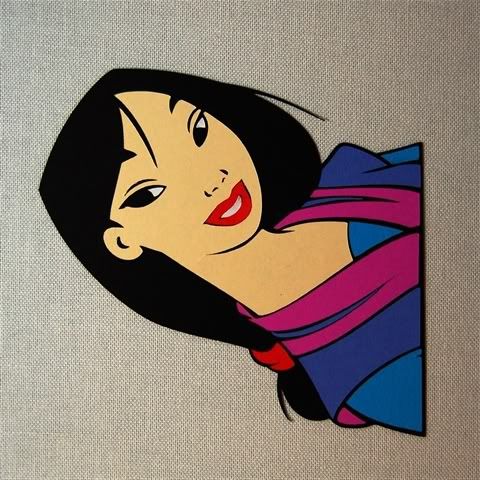
This was my first attempt at making a Disney character - Mulan, from the Happily Ever After cartridge. I first set up the base on the left side of the mat using a size of 5 inches. Leaving the size at 5 inches, I then used the various function keys and shift key to get all the layers that needed to be cut. It is important to keep the size slider in the same position as the cartridge is programmed to make the layers proportional in size to the base layer.

Here you can see the feature keys that are used to make the layers.

The slider should remain at 5 inches for all the pieces that need to be cut - this shows the key selected for the magenta part of her costume (bottom row, fifth from right).

Above is a close up view of the placement of all of the pieces to be layered for the Mulan head and below you can see my mat set up to cut these pieces - by using the grid you can approximate the size of each element and stick a piece of the appropriate color paper in the area where that element will be cut.

This is a great time saver and you can leave each set of pieces on the mat until you are ready to add them to the base so you are less likely to lose some of these small bits!
Wow!!! That is a smart way to do it. I have the cart but didn't use it as much because of the loading and unloading paper all the time. But this would make it so much easier... Okay, I hate to admit it, but I am slowly falling in love with the DS.
ReplyDeleteI will be watching for the card....
Your Cricut MB SS....
I love how you think -- your incredible designs, beautifully explained to make as easy as possible. Thanks so much for sharing. I've used several of your designs & even posted some on my blog. I always look forward to your next design!
ReplyDeleteThat is such a fantastic idea!! It will come in handy when making 25 Disney Princess invitations.
ReplyDeleteThank you so much for sharing your expertise!
Christine
Diane,
ReplyDeleteI just finished looking at your video on how to set up the paper and the DS to cut the Disney characters and I thank you very much for helping me understand. I have a question about setting up each page to show only the preview instead of all of the pages at once. How do you set it up?
Thanks also for the Cinderella file, did you post the file for Jade, or can you send it to me? cal8007@aol.com
Carmen
Hi Carmen,
ReplyDeleteYou can right click on your page and untick "include page in preview" so that you will see only a certain page. Only the pages that have this checked will show when you do a preview.
I hope that helps - let me know if I didn't answer your question.
Diane